


Effortless ASP.NET Core Minimal API Testing with the Visual Studio HTTP Editor
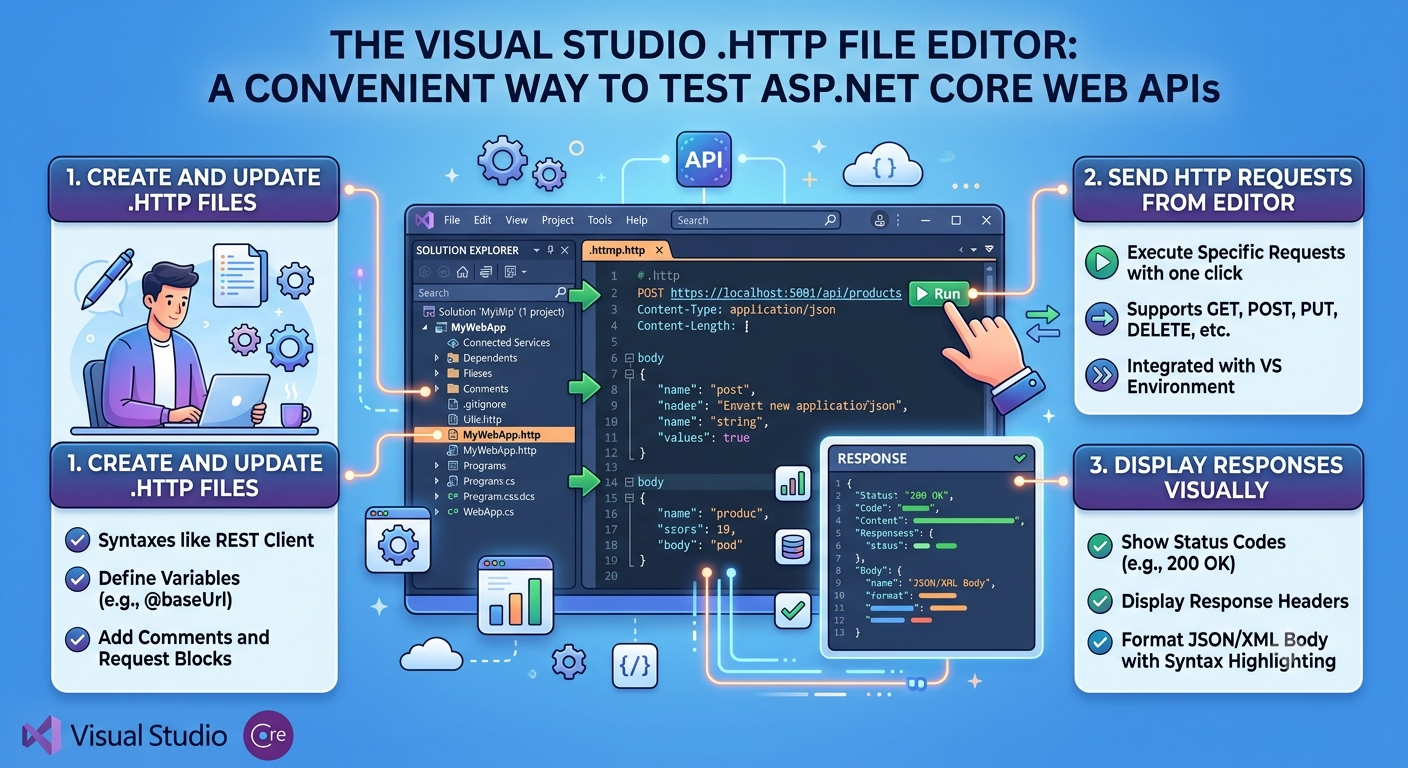
The Visual Studio HTTP File Editor is a powerful built-in tool for testing ASP.NET Core Web APIs and Minimal APIs directly from the IDE. Instead of relying on external tools like Postman, you can create, edit, and execute HTTP requests using .http files, making API development and debugging faster and more efficient.
With the Visual Studio 2026 HTTP File Editor, you can:
- Create and manage .http files for organizing and storing API requests.
- Send HTTP requests (GET, POST, PUT, DELETE, PATCH, and more) directly from Visual Studio.
- View and inspect HTTP responses, including status codes, headers, and response bodies, without leaving the editor.
This built-in feature streamlines Web API testing, improves developer productivity, and provides a seamless workflow for developing, debugging, and validating ASP.NET Core Web APIs within Visual Studio.
Page Contents
Create a .http file
Follow the steps to create a .http file in Visual Studio.
- In Solution Explorer, right-click the project name.
- In the context menu, select Add > New Item.
- In the Add New Item dialog, put http in the search box. This will show the http file.
- Select HTTP File, and select Add.
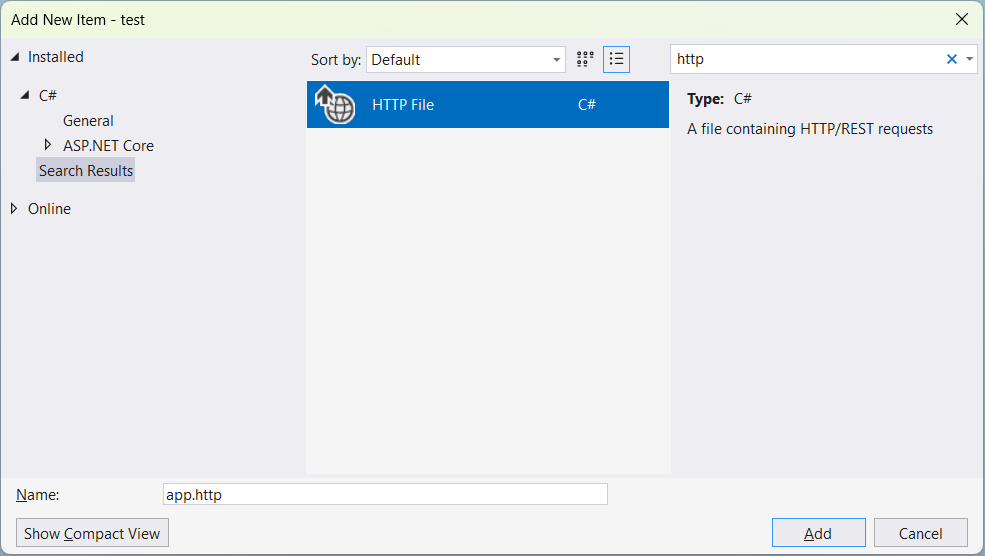
By default the .http is empty. We will add test codes in just a moment. But before that we need to see our Web API.
We have our Minimal API code which performs CRUD operations on a Work class.
The following code defines a set of ASP.NET Core Minimal API endpoints for performing CRUD (Create, Read, Update, and Delete) operations on a Work resource. The MapPost() endpoint creates a new work item and returns a 201 Created response with the resource location. The MapGet() endpoints retrieve all work items, fetch only completed items, or return a specific work item by its ID.
The MapPut() endpoint updates an existing work item after verifying that it exists. The MapPatch() endpoint updates an existing work by HTTP Patch method. In the last their is MapDelete() endpoint which removes a work item from the database. Each endpoint uses Entity Framework Core through the WorkDb context to interact with the database asynchronously, ensuring efficient and responsive API operations.
app.MapPost("/works", async (Work work, WorkDb db) =>
{
    db.Works.Add(work);
    await db.SaveChangesAsync();

    return Results.Created($"/works/{work.Id}", work);
});

app.MapGet("/works", async (WorkDb db) =>
    await db.Works.ToListAsync());

app.MapGet("/works/{id}", async (int id, WorkDb db) =>
    await db.Works.FindAsync(id)
        is Work work
            ? Results.Ok(work)
            : Results.NotFound());

app.MapPut("/works/{id}", async (int id, Work work, WorkDb db) =>
{
    var todo = await db.Works.FindAsync(id);

    if (todo is null) return Results.NotFound();

    todo.Name = work.Name;
    todo.TimeStart = work.TimeStart;
    todo.TimeEnd = work.TimeEnd;
    todo.IsComplete = work.IsComplete;

    await db.SaveChangesAsync();

    return Results.NoContent();
});

app.MapPatch("/works/{id}", async (int id, WorkDto workDto, WorkDb db) =>
{
    var todo = await db.Works.FindAsync(id);

    if (todo is null) return Results.NotFound();

    if (workDto.Name is not null) todo.Name = workDto.Name;
    if (workDto.IsComplete is not null) todo.IsComplete = workDto.IsComplete.Value;
    if (workDto.TimeStart is not null) todo.TimeStart = workDto.TimeStart;
    if (workDto.TimeEnd is not null) todo.TimeEnd = workDto.TimeEnd;

    await db.SaveChangesAsync();

    return Results.NoContent();
});

app.MapDelete("/works/{id}", async (int id, WorkDb db) =>
{
    if (await db.Works.FindAsync(id) is Work work)
    {
        db.Works.Remove(work);
        await db.SaveChangesAsync();
        return Results.NoContent();
    }

    return Results.NotFound();
});
The work class is given below:
public class Work
{
    public int Id { get; set; }
    public string Name { get; set; }
    public string TimeStart { get; set; }
    public string TimeEnd { get; set; }
    public bool IsComplete { get; set; }
}
The WorkDto.cs is:
public class WorkDto
{
    public string Name { get; set; }

    public string TimeStart { get; set; }

    public string TimeEnd { get; set; }

    public bool? IsComplete { get; set; }
}
Now we are going to test this Web API with .http file.
Endpoints Explorer in Visual Studio
The Endpoints Explorer is a Visual Studio tool window that displays all the endpoints available in your ASP.NET Core Web API. It provides a convenient way to view your API routes and quickly test them by generating or using a .http file, allowing you to send HTTP requests directly from within Visual Studio.
Open Endpoints Explorer
Select View > Other Windows > Endpoints Explorer. This will open Endpoints Explorer.
The Endpoints Explorer will show all the Web API Endpoints defined in the app. If you don’t see the endpoints then click the Refresh button. See below image:
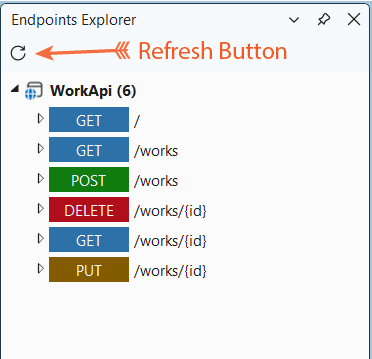
We can now generate request to the .http file. For this, in the Endpoints Explorer, right click on the GET Endpoint on /Work and select Generate Request.
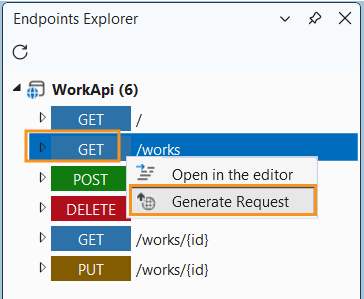
The request is added to that .http file as shown below:
@WorkApi_HostAddress = https://localhost:7026

GET {{WorkApi_HostAddress}}/works

###
Here’s what each part does:
@WorkApi_HostAddress = https://localhost:7026- This defines a variable named WorkApi_HostAddress.
- The @ prefix marks it as a variable declaration.
- Its value is https://localhost:7026 — likely the base URL of a locally running Web API project (the port 7026 is typical of an ASP.NET Core project running over HTTPS during development).
GET {{WorkApi_HostAddress}}/works- This is the actual HTTP request.
- GET is the HTTP method.
- {{WorkApi_HostAddress}} inserts the value of the variable defined above using double-curly-brace syntax.
- So this line effectively resolves to:
GET https://localhost:7026/worksIt sends a GET request to the /works endpoint — presumably a controller/route in the API that returns a list of “works” (e.g., work items, projects, or records, depending on the app’s domain).
http
###- This is a request separator.
- .http files can contain multiple requests in one file, and ### marks the boundary between them, so tools know where one request ends and the next begins.
- Since there’s nothing after it here, it just marks the end of this single request block (and would let you add another request below it if needed).
If you click “Send Request” (you’d see a clickable link above the GET line) it will:
- Substitute the variable.
- Fire off an HTTPS GET request to https://localhost:7026/works.
- Show you the response (status code, headers, body) in the Response pane given on the side.
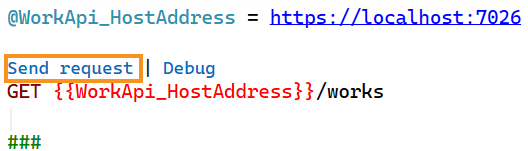
Note that you have to run the project before you make any API request. Also since there are no work records in the database so you will see an empty response. Lets start by posting data with .http file editor.
Test POST Endpoint with .http File Editor
The Minimal API Post Endpoint create a Work record and it’s code is given below:
app.MapPost("/works", async (Work work, WorkDb db) =>
{
    db.Works.Add(work);
    await db.SaveChangesAsync();

    return Results.Created($"/works/{work.Id}", work);
});
Lets test it.
In the Endpoints Explorer, right click on the POST Endpoint on /Work and select Generate Request.
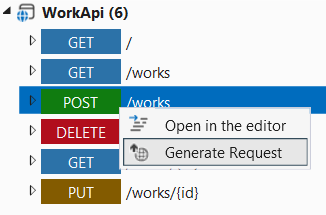
POST request code lines will be added to the .http file as shown below:
POST {{WorkApi_HostAddress}}/works

###
A POST request requires both headers and a request body. To define these components, add the following lines immediately after the POST request line:
Content-Type: application/json

{
  "name":"eat breakfast",
  "isComplete":true,
  "timeStart":"8:00:00",
  "timeEnd":"8:30:00"
}
The preceding code adds a Content-Type header and a JSON request body. The file contents now look as:
@WorkApi_HostAddress = https://localhost:7026

POST {{WorkApi_HostAddress}}/works
Content-Type: application/json

{
  "name":"eat breakfast",
  "isComplete":true,
  "timeStart":"8:00:00",
  "timeEnd":"8:30:00"
}
###
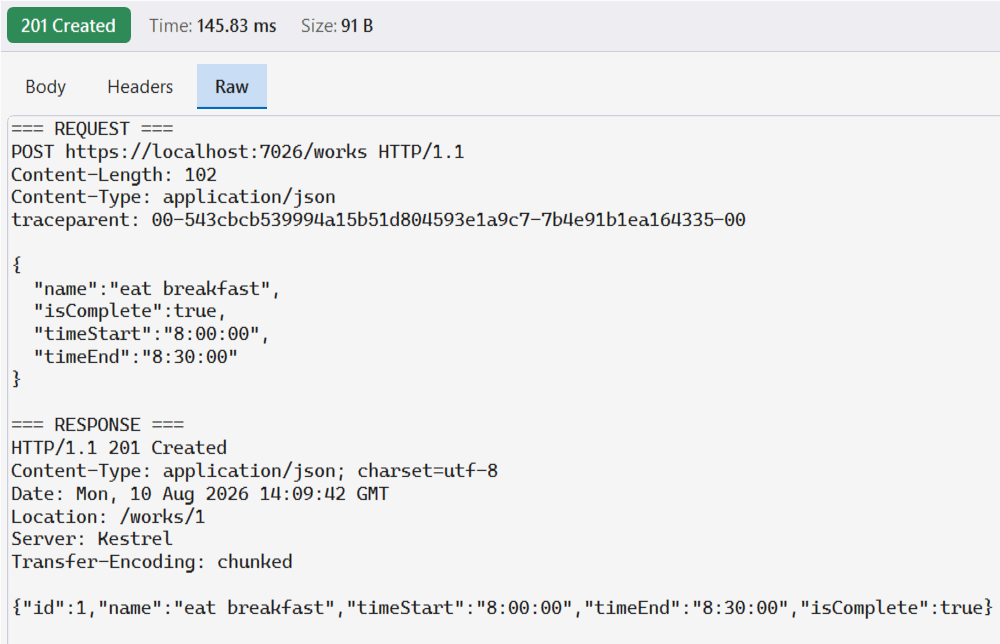
Click the Send request link that is above the POST request line. The POST request is sent to the API and the response is displayed in the Response pane.
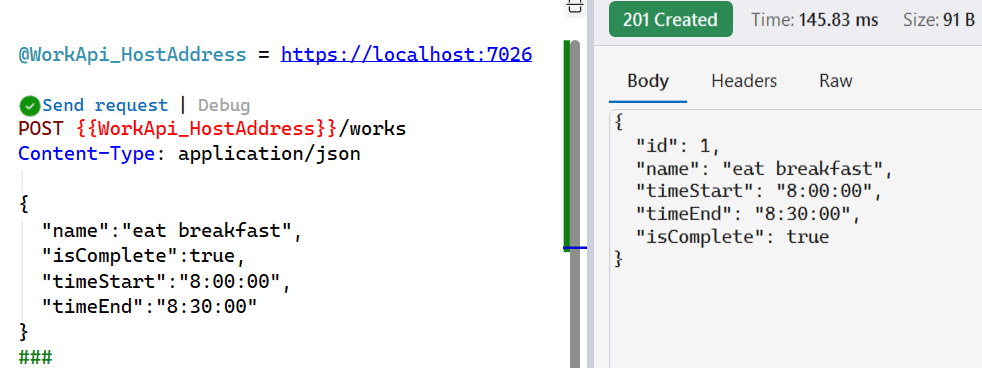
You will see 201 Created response along with the json of the newly created work record.
{
  "id": 1,
  "name": "eat breakfast",
  "timeStart": "8:00:00",
  "timeEnd": "8:30:00",
  "isComplete": true
}
Click on the Headers link to see the Request Headers.
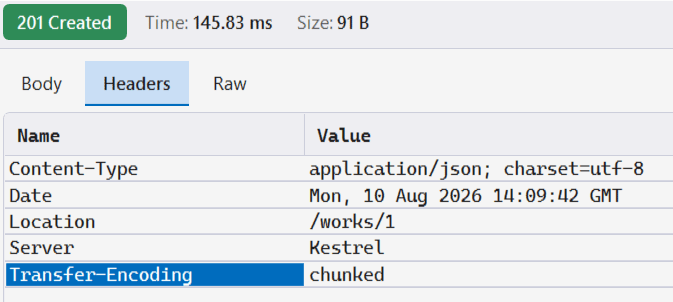
Also click on the Raw link to see the full Request and Response made to the API.
Test GET Endpoints with .http File Editor
The Minimal API has 2 GET Endpoints as defined below. The first one gets all the Work records while the second get a particular Work record by it’s ID.
app.MapGet("/works", async (WorkDb db) =>
    await db.Works.ToListAsync());

app.MapGet("/works/{id}", async (int id, WorkDb db) =>
    await db.Works.FindAsync(id)
        is Work work
            ? Results.Ok(work)
            : Results.NotFound());
In Endpoints Explorer, right-click the first GET endpoint, and select Generate request. This is the same thing we did earlier for the POST endpoint to.
The following content is added to the .http file:
GET {{WorkApi_HostAddress}}/works

###
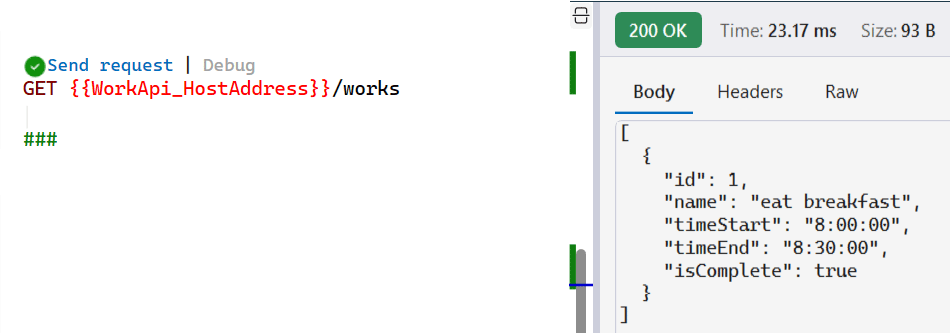
Now, select the Send request link that is given above the new GET request line.
The GET request is sent to the Minimal Web API and the response is displayed in the Response pane.
The response body is similar to the following JSON:
[
  {
    "id": 1,
    "name": "eat breakfast",
    "timeStart": "8:00:00",
    "timeEnd": "8:30:00",
    "isComplete": true
  }
]
Also check the below image where we have shown this:
Next, in Endpoints Explorer, right-click the /works/{id} GET endpoint and select Generate request. The following content is added to the .http file:
@id=0
GET {{WorkApi_HostAddress}}/works/{{id}}
It now becomes:
@id=1
GET {{WorkApi_HostAddress}}/works/{{id}}- Replace @id=0 with @id=1 since this is the Id of the 1st Work record whose value we have to fetch.
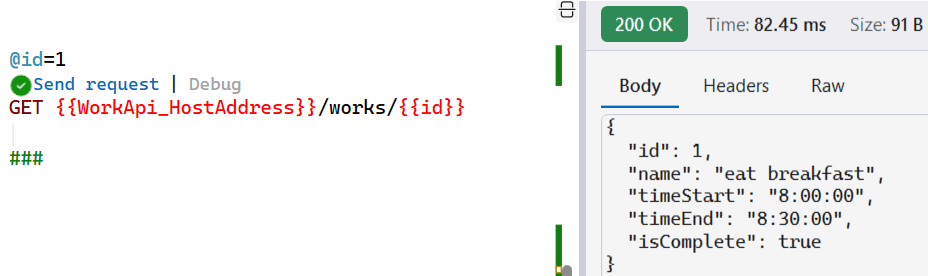
- Select the Send request link that is above the new GET request line.
- The GET request is sent to the app and the response is displayed in the Response pane.
The response body is similar to the following JSON:
{
  "id": 1,
  "name": "eat breakfast",
  "timeStart": "8:00:00",
  "timeEnd": "8:30:00",
  "isComplete": true
}
We have shown this in the below image:
Test PUT Endpoint with .http File Editor
The Minimal Web API’s PUT Endpoint updates a given Work record and is given below:
app.MapPut("/works/{id}", async (int id, Work work, WorkDb db) =>
{
    var todo = await db.Works.FindAsync(id);

    if (todo is null) return Results.NotFound();

    todo.Name = work.Name;
    todo.TimeStart = work.TimeStart;
    todo.TimeEnd = work.TimeEnd;
    todo.IsComplete = work.IsComplete;

    await db.SaveChangesAsync();

    return Results.NoContent();
});
Before making a PUT request, make sure the item already exists in the database. If necessary, first send a POST request to create the item, and then use the PUT request to update it.
In Endpoints Explorer, right-click the PUT endpoint and select Generate request. Visual Studio adds the following content to the .http file:
PUT {{WorkApi_HostAddress}}/works/{{id}}
Content-Type: application/json

{
  //Work
}

###
We need to update it so in the PUT request line, replace {id} with 1. This is the Id of the Work records that needs to be updated. Then add the following lines containing the json of the Work record in side the curly brackets:
"id": 1,
"name":"eat supper",
"timeStart":"9:00:00",
"timeEnd":"9:30:00",
"isComplete":false
It now becomes:
PUT {{WorkApi_HostAddress}}/works/1
Content-Type: application/json

{
  "id": 1,
  "name":"eat supper",
  "timeStart":"9:00:00",
  "timeEnd":"9:30:00",
  "isComplete":false
}

###
We added a Content-Type header and a JSON request body of the Work that is to be updated. Notice I have changed the values of name to “eat supper”, IsComplete to “false” and also the times.
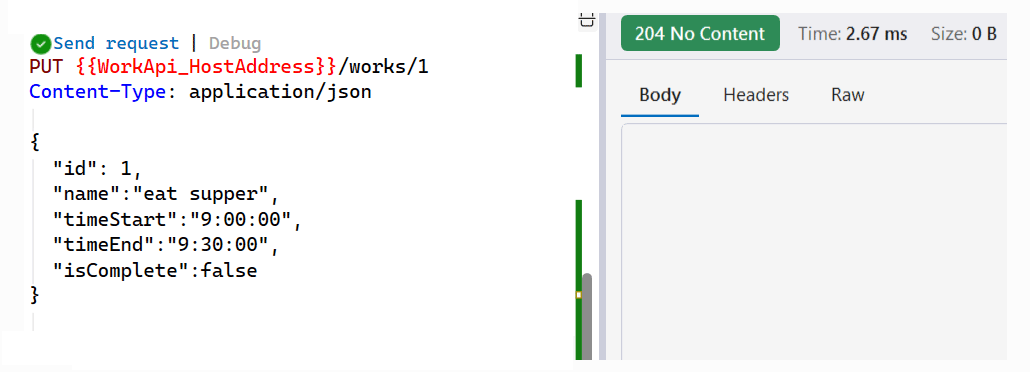
Now, select the Send request link above the new PUT request to send the request.
The PUT request is sent to the application, and the response appears in the Response pane. Because the operation completes successfully without returning content, the response body is empty and the HTTP status code is 204 No Content.
Check the record is updated by making a GET request to the API again.
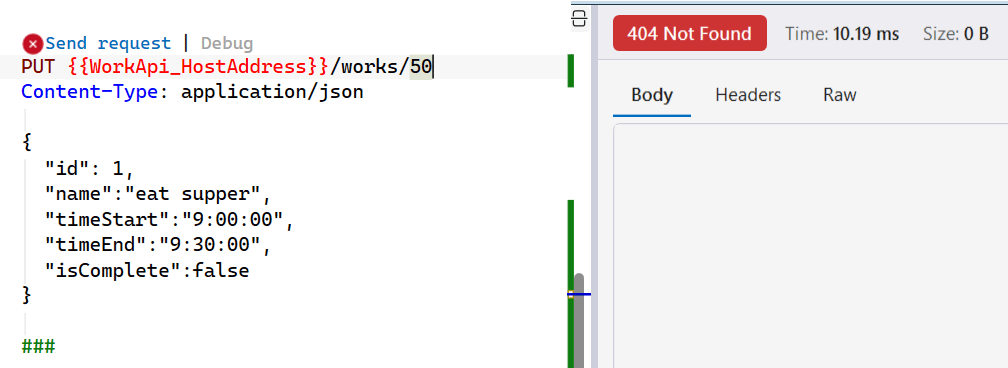
Suppose If we try to update a records which is not present in the database then we will get 404 Not Found response. Change the id value to 50, the code now becomes:
PUT {{WorkApi_HostAddress}}/works/50
Content-Type: application/json

{
  "id": 1,
  "name":"eat supper",
  "timeStart":"9:00:00",
  "timeEnd":"9:30:00",
  "isComplete":false
}

###
Since 50 th Work records is not present so we will get 404 Not Found response, check below image:
Test PATCH Endpoints with .http File Editor
The Minimal Web API’s PATCH Endpoint updates a given Work record by HTTP PATCH method:
app.MapPatch("/works/{id}", async (int id, WorkDto workDto, WorkDb db) =>
{
    var todo = await db.Works.FindAsync(id);

    if (todo is null) return Results.NotFound();

    if (workDto.Name is not null) todo.Name = workDto.Name;
    if (workDto.IsComplete is not null) todo.IsComplete = workDto.IsComplete.Value;
    if (workDto.TimeStart is not null) todo.TimeStart = workDto.TimeStart;
    if (workDto.TimeEnd is not null) todo.TimeEnd = workDto.TimeEnd;

    await db.SaveChangesAsync();

    return Results.NoContent();
});
Lets test it. On the Endpoints Explorer, right-click the PATCH endpoint, and select Generate request. This adds the following code to the http file:
PATCH {{WorkApi_HostAddress}}/works/{id}

###
In the PATCH request line, replace {id} with 1 since we will update the 1st records. Next, add the following code lines after it.
Content-Type: application/json

{
  "name": "sleep",
  "isComplete":false
}
The above code adds a Content-Type header and a JSON request body with only 2 fields to update. These are:
- name
- isComplete
The full Patch code becomes.
PATCH {{WorkApi_HostAddress}}/works/{id}
Content-Type: application/json

{
  "name": "sleep",
  "isComplete":false
}

###
Select the Send request link that is above the new PATCH request line.
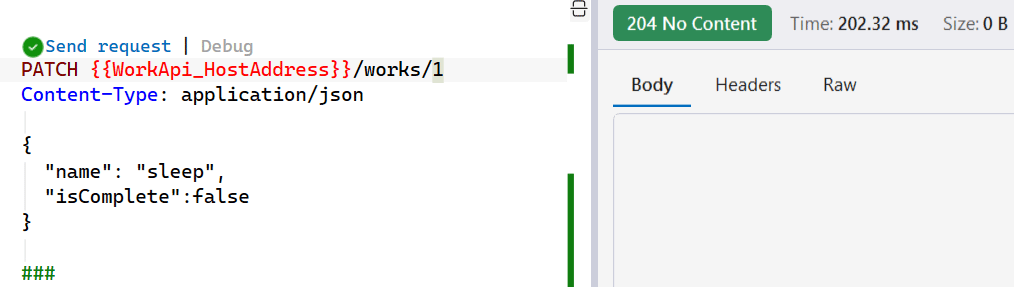
The PATCH request is sent to the application, and the response appears in the Response pane. The response body is empty, and the HTTP status code is 204 No Content, indicating that the update was completed successfully without returning any content.
Make a new GET request to the API to confirm the change has been made to the Work.
Test DELETE Endpoints with .http File Editor
The Minimal API Delete endpoint is:
app.MapDelete("/works/{id}", async (int id, WorkDb db) =>
{
    if (await db.Works.FindAsync(id) is Work work)
    {
        db.Works.Remove(work);
        await db.SaveChangesAsync();
        return Results.NoContent();
    }

    return Results.NotFound();
});
Lets test this endpoint. Just like what we did before, start by right-clicking the DELETE endpoint in the Endpoints Explorer, and select Generate request.
A DELETE request is added to http file.
Replace {id} in the DELETE request line with 1. It will now look as:
DELETE {{WorkApi_HostAddress}}/works/1

###
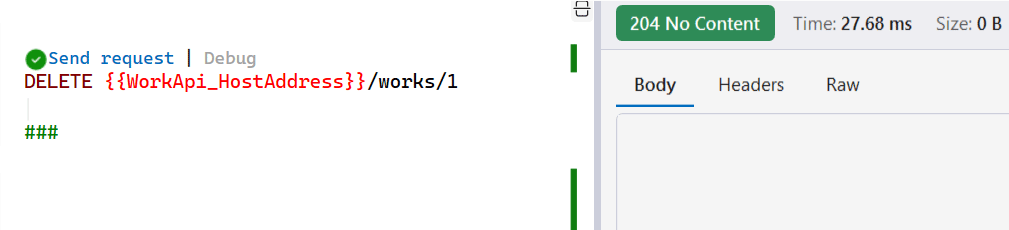
Select the Send request link for the DELETE request. Visual Studio sends the request to the application, and the response appears in the Response pane. The response body is empty, and the HTTP status code is 204 No Content, indicating that the resource was successfully deleted.
Make a GET request to confirm the Work is indeed deleted.
Test File Upload Endpoints with .http File Editor
The Minimal API has an endpoint to upload files. Check the below code:
app.MapPost("/upload", async (IFormFile file) =>
{
    if (file == null || file.Length == 0)
        return Results.BadRequest("No file uploaded.");

    var filePath = Path.Combine("Uploads", file.FileName);

    Directory.CreateDirectory(Path.GetDirectoryName(filePath)!);

    using var stream = new FileStream(filePath, FileMode.Create);
    await file.CopyToAsync(stream);

    return Results.Ok(new
    {
        file.FileName,
        file.Length
    });
}).DisableAntiforgery();
The API code above accepts the uploaded file as an IFormFile parameter and saves it to the Uploads directory.
Notice that we have disabled anti-forgery token by adding DisableAntiforgery(). This is only done for testing it using a .http file. Otherwise we will get the following error:
Invalid anti-forgery token found when reading parameter "IFormFile file"Right-clicking the POST /upload endpoint in the Endpoints Explorer, and select Generate request.
Update the code as shown below:
POST {{WorkApi_HostAddress}}/upload
Content-Type: multipart/form-data; boundary=----WebKitFormBoundary7MA4YWxkTrZu0gW

------WebKitFormBoundary7MA4YWxkTrZu0gW
Content-Disposition: form-data; name="file"; filename="sample.txt"
Content-Type: text/plain

< ./sample.txt
------WebKitFormBoundary7MA4YWxkTrZu0gW--
The above code uploads sample.txt file to the /upload endpoint as a multipart/form-data request.
Content-Type: multipart/form-data; boundary=----WebKitFormBoundary7MA4YWxkTrZu0gWmultipart/form-data tells the server that the request contains form data that may include files.
The boundary separates the individual parts of the request. In this example, the boundary is:
----WebKitFormBoundary7MA4YWxkTrZu0gWThe same boundary must be used throughout the request.
------WebKitFormBoundary7MA4YWxkTrZu0gWThis marks the beginning of a part in the multipart request.
In this case, there is one part: the uploaded file.
Content-Disposition: form-data; name="file"; filename="sample.txt"This line provides information about the form field and the file.
- form-data — indicates that this is a form-data field.
- name=”file” — must match the parameter name in your Minimal API.
IFormFile filefilename=”sample.txt” — specifies the name of the uploaded file.
The name=”file” part is particularly important because ASP.NET Core uses it to bind the uploaded file to.
Content-Type: text/plainThis tells the server that sample.txt contains plain-text data.
For example, if you were uploading a PDF, you could use:
Content-Type: application/pdfRead the file:
< ./sample.txt This is an important feature of the Visual Studio .http file editor.
The “<” operator tells Visual Studio to read the contents of sample.txt from the local filesystem and use them as the body of this multipart section.
End of the multipart request:
------WebKitFormBoundary7MA4YWxkTrZu0gW--The final — after the boundary indicates that this is the end of the multipart request.
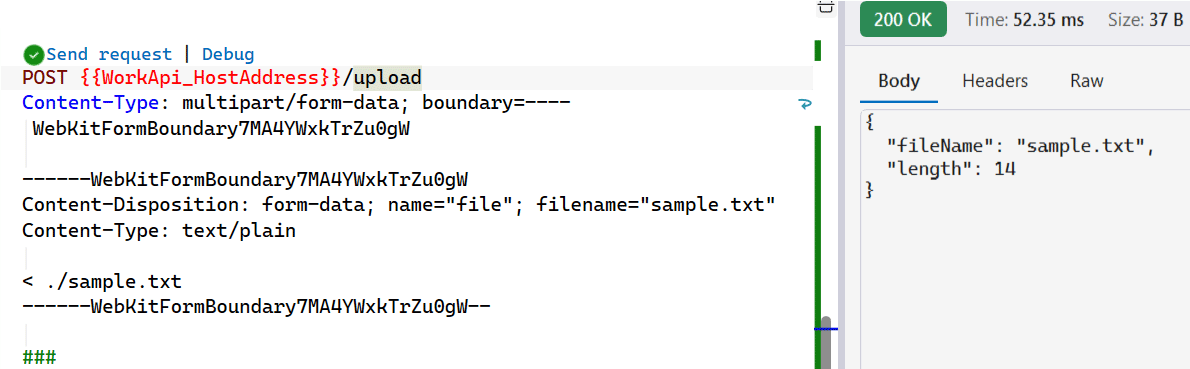
Before you click the Send request make an “Uploads” directory in the app root folder. Finally, select the Send request link to upload the file.
The below image shows the response.
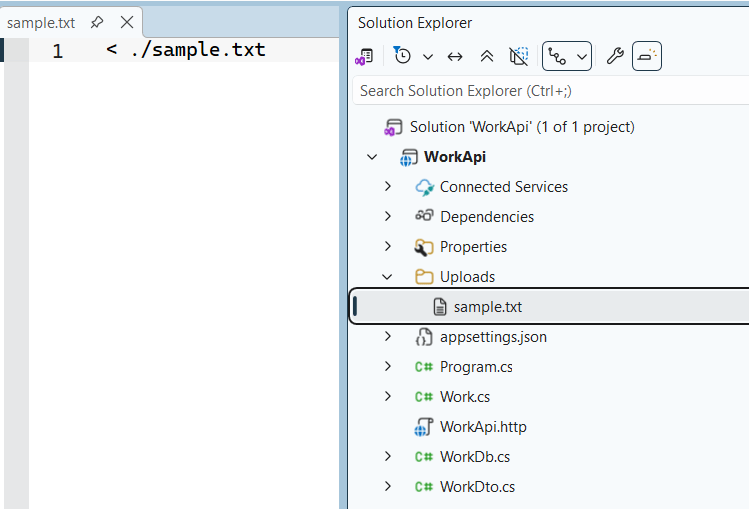
Open the “Uploads” folder to find the “sample.txt” file uploaded successfully. The file content will be < ./sample.txt. See below image:
Understanding .http file in Details
We will now go through details of .http file so that you can understand how to write request based on different conditions.
Request headers
To add one or more headers, place each header on its own line directly after the request line, with no blank lines separating the request line from the first header or between the headers themselves. Each header follows the format HeaderName: Value, as shown in the example below:
GET https://localhost:8778/weatherforecast
Cache-Control: max-age=857800
Age: 150

###
Here we have 2 headers: Cache-Control with value max-age=857800. And Age with value 150.
Request body
To include a body with a request (typically for POST, PUT, or PATCH), leave exactly one blank line after the last header, then write the body content starting on the next line — this blank line is required to separate headers from the body. For a JSON body, set Content-Type: application/json as a header and write the JSON directly below:
# creating a new work by making a post request to the API
POST https://localhost:8778/api/work
Content-Type: application/json

{
  "title": "Buy groceries",
  "isComplete": false
}
Note that lines that start with either # or // are comments.
Variables
In a Visual Studio .http file, you define a variable on a line that starts with @, using the syntax @VariableName=Value. Variable names are case-sensitive and can’t contain spaces. The value can be any characters, including null to represent a null value.
Once defined, a variable can be referenced in any request that appears later in the file. To reference it, wrap the variable name in double curly braces: {{ and }}. The example below shows two variables being defined and then used in a request:
@hostname=localhost
@port=99887
GET https://{{hostname}}:{{port}}/works
Variables can also be defined in terms of other variables, as long as those variables were defined earlier in the file. The example below uses a single combined variable in the request, instead of the two separate variables shown in the previous example:
@hostname=localhost
@port=99887
@host={{hostname}}:{{port}}
GET https://{{host}}/works
Environment files
To assign different values to variables for different environments, create a file named http-client.env.json. Place this file in the same directory as your .http file or in any of its parent directories. Visual Studio uses this environment file to provide environment-specific variable values when sending HTTP requests.
The following example demonstrates the structure of an http-client.env.json environment file:
{
  "dev": {
    "HostAddress": "https://localhost:99887"
  },
  "remote": {
    "HostAddress": "https://yogihosting.com"
  }
}
An environment file is a JSON file that defines one or more named environments, such as dev and remote. Each environment contains one or more variables, such as HostAddress, with values specific to that environment.
Variables defined in an environment file are referenced in the same way as regular .http file variables, using double curly braces such as {{HostAddress}}. The following example demonstrates how to reference an environment variable in an HTTP request:
GET {{HostAddress}}/worksThe value assigned to a variable when an HTTP request is sent depends on the environment selected from the environment selector dropdown in the upper-right corner of the .http file editor. Select the required environment to use its corresponding variable values when executing the request. The following screenshot shows the environment selector:
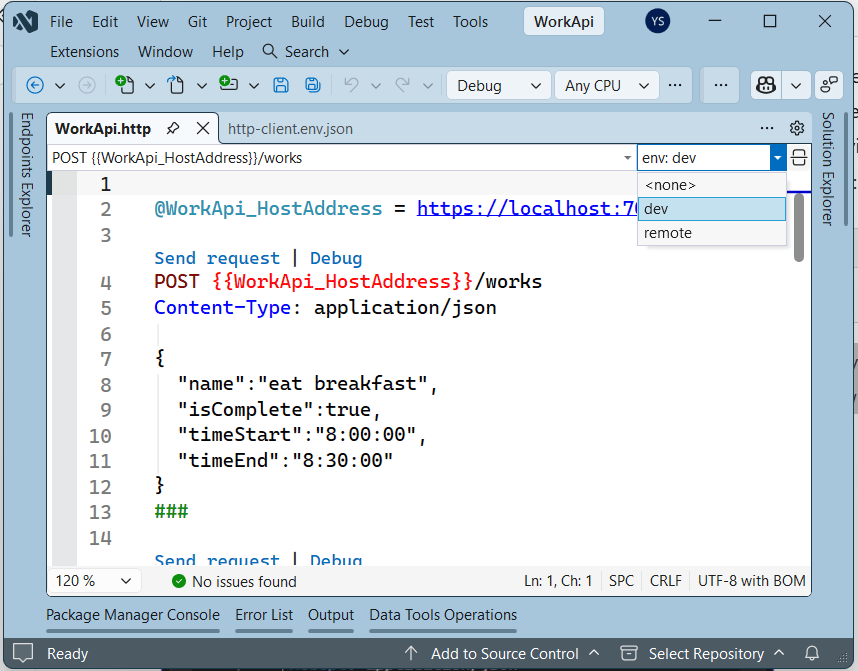
The environment file does not need to be located in the project folder. Visual Studio searches for a file named http-client.env.json starting in the directory that contains the .http file. If the file is not found there, Visual Studio continues searching each parent directory until it finds one. The search stops as soon as a matching file is found, so the closest http-client.env.json file to the .http file takes precedence.
Visual Studio displays warnings in the following situations:
- The .http file references a variable that is not defined in either the .http file or the environment file.
- The environment file defines a variable that is not referenced anywhere in the .http file.
A variable can be defined in both the .http file and the environment file. When the same variable exists in both files, the value defined directly in the .http file takes precedence over the value defined in the environment file.
Shared variables
$shared is a special environment name used to define variables whose values are common across multiple environments. Instead of repeating the same variable in each environment, you can define it once under $shared and reuse it across environments.
For example, consider the following http-client.env.json environment file:
{
    "$shared": {
        "HostAddress": "https://localhost:99887"
    },
    "dev1": {
        "username": "Jack"
    },
    "dev2": {
        "username": "Alice"
    },
    "staging": {
        "username": "staginguser",
        "HostAddress": "https://staging.yogihosting.com"
    }
}
In the preceding example, the $shared environment defines the HostAddress variable with the value localhost:99887. This value serves as a default for any environment that does not define its own HostAddress variable.
Therefore, when the “dev1” or “dev2” environment is selected, HostAddress uses the value from $shared because neither environment defines its own value. However, the staging environment defines HostAddress as https://staging.yogihosting.com, so that value takes precedence over the $shared default.
Request variables
In a Visual Studio .http file, request variables are variables that are created from the response of one HTTP request and then used in subsequent requests. They are useful when one request depends on data returned by another request—for example, using an authentication token or an ID returned from a POST request.
Request variables enable you to automate this process. For example, suppose an .http file contains a request that authenticates the user and is named login. The response from this request is a JSON object containing a bearer token in a property named token. You can then use this token in subsequent requests by passing it in the Authorization header. The following example demonstrates how to accomplish this:
@WorkApi_HostAddress = https://localhost:7026

# @name login

POST {{WorkApi_HostAddress}}/login
Content-Type: application/json

{
  "name":"eat breakfast",
  "isComplete":true,
  "timeStart":"8:00:00",
  "timeEnd":"8:30:00"
}

###

GET {{WorkApi_HostAddress}}/works
Authorization: Bearer {{login.response.body.$.token}}

###
The expression {{login.response.body.$.token}} is used to retrieve the bearer token from the response of the login request. Each part of the expression has a specific purpose:
- login: The name assigned to the HTTP request.
- response: Refers to the response returned by that request.
- body: Refers to the response body.
- $: Represents the root of the JSON document in the response body.
- token: Identifies the token property whose value is extracted from the JSON response.
User-specific environment files
A user-specific value is a value that a developer needs for testing but does not want to share with other team members. Since the http-client.env.json file is typically checked into source control, you should not store user-specific values in this file. Instead, Visual Studio provides a separate file named http-client.env.json.user for storing personal or local environment values. This file is located in the same folder as the http-client.env.json file. Files with the .user extension are excluded from source control by default when using Visual Studio’s built-in source control features.
When Visual Studio loads an http-client.env.json file, it automatically looks for a corresponding http-client.env.json.user file in the same directory. If the same variable is defined in both files for the same environment, the value from the http-client.env.json.user file takes precedence.
The following example demonstrates how a user-specific environment file works. Suppose the .http file contains the following content:
GET {{WorkApi_HostAddress}}/{{Path}}
Accept: application/json
Let the http-client.env.json file contains the following content:
{
  "dev": {
    "WorkApi_HostAddress": "https://localhost:99887",
    "Path": "works"
  },
  "remote": {
    "WorkApi_HostAddress": "https://yogihosting.com",
    "Path": "works"
  }
}
If there’s a user-specific environment file that contains the following content:
{
  "dev": {
    "Path": "swagger/index.html"
  }
}
When the user selects the “dev” environment, the request is sent to https://localhost:99887/swagger/index.html because the Path value in the http-client.env.json.user file overrides the value from the http-client.env.json file.
With the same environment files, suppose the variables are defined in the .http file:
@WorkApi_HostAddress=https://yogihosting.com
@Path=works

GET {{WorkApi_HostAddress}}/{{Path}}
Accept: application/json
In this scenario, the “dev” environment request is sent to https://yogihosting.com/works because variable definitions in .http files override environment file definitions.
ASP.NET Core User Secrets
When testing ASP.NET Core Web APIs using .http files in Visual Studio, you may need to work with sensitive values such as API keys, passwords, connection strings, or authentication tokens. These values should not be stored directly in the .http file or committed to source control.
ASP.NET Core provides User Secrets as a secure way to store sensitive development-time configuration values outside your project files.
For example, suppose your ASP.NET Core application has a secret named “ApiKey”. You can store it using the ASP.NET Core Secret Manager:
dotnet user-secrets set "ApiKey" "my-secret-api-key"The secret is stored outside the project directory and is not committed to source control.
Visual Studio can access ASP.NET Core User Secrets through environment variables defined in the http-client.env.json file. For example:
{
  "dev": {
    "ApiKey": {
      "provider": "AspnetUserSecrets",
      "secretName": "ApiKey"
    }
  }
}
Here:
- ApiKey — the variable name you will use in the .http file.
- “provider”: “AspnetUserSecrets” — tells Visual Studio to get the value from ASP.NET Core User Secrets.
- “secretName”: “ApiKey” — specifies the name of the User Secret to retrieve.
You can then use the variable in your .http file request:
GET https://localhost:5001/api/products
X-API-Key: {{ApiKey}}
Here, {{ApiKey}} is replaced with the value defined for the ApiKey variable when the request is executed.
When you send the request, Visual Studio retrieves the value of the ApiKey User Secret and uses it in the X-API-KEY header. The actual secret value isn’t displayed by the .http editor’s autocomplete.
So the flow is:
dotnet user-secrets set "ApiKey" "my-secret-api-key"
                    │
                    ▼
             ASP.NET Core
             User Secrets
                    │
                    ▼
        http-client.env.json
        provider: AspnetUserSecrets
                    │
                    ▼
             {{ApiKey}}
                    │
                    ▼
       X-API-KEY: <secret value>
One important detail – The http-client.env.json file itself doesn’t contain the secret value, so it can safely be committed to source control:
{
  "dev": {
    "ApiKey": {
      "provider": "AspnetUserSecrets",
      "secretName": "ApiKey"
    }
  }
}
The actual value remains in ASP.NET Core’s User Secrets store, outside the project. ASP.NET Core’s Secret Manager is specifically intended for keeping development secrets out of source-controlled project files.
Azure Key Vault
This below http-client.env.json configuration tells Visual Studio’s .http file editor to retrieve a secret from Azure Key Vault and make it available as an HTTP client variable.
{
  "dev": {
    "AKVSecret": {
      "provider": "AzureKeyVault",
      "secretName": "SecretInKeyVault",
      "resourceId": "/subscriptions/3a914c59-8175-9e0e540/resourceGroups/my-key-vault-rg/providers/Microsoft.KeyVault/vaults/my-key-vault-01182024"
    }
  }
}
Note: To retrieve a value from Azure Key Vault, you must be signed in to Visual Studio with an account that has the necessary permissions to access the target Key Vault.
The variable is named AKVSecret which pulls its value from Azure Key Vault. Values of resourceId and secretName will be get from Azure portal.
The AKVSecret object defines the following properties:
| Property | Description |
|---|---|
provider | Specifies the secret provider. For Azure Key Vault, set this value to AzureKeyVault. |
secretName | Specifies the name of the secret to retrieve from Azure Key Vault. |
resourceId | Specifies the Azure resource ID of the Key Vault that contains the secret. |
Now the following .http file has a request that uses this secret value.
GET {{HostAddress}}{{Path}}
X-AKV-SECRET: {{akvSecret}}
Environment variables
$processEnv is a dynamic variable function in Visual Studio’s .http file editor that tells the HTTP client to read a value from the environment variables of the process running the request.
Example:
GET {{HostAddress}}{{Path}}
X-UserName: {{$processEnv USERNAME}}
{{$processEnv USERNAME}} – Get the value of the USERNAME environment variable. For example, if the process environment contains:
USERNAME=YogiHostingthen:
X-UserName: {{$processEnv USERNAME}}effectively becomes:
X-UserName: Yogesh.env files
To retrieve the value of a variable defined in a .env file, use the $dotenv dynamic variable. The .env file must be located in the project folder. The syntax for $dotenv is similar to $processEnv. For example, if the .env file contains the following:
API_KEY=my-secret-api-key
API_URL=https://api.example.com
You can access these values in a .http file using the $dotenv dynamic variable:
GET {{$dotenv API_URL}}/products
X-API-Key: {{$dotenv API_KEY}}
When the request is executed, Visual Studio reads the values from the .env file. The request is effectively sent as:
GET https://api.example.com/products
X-API-Key: my-secret-api-key
Random integers
To generate a random integer, use the $randomInt dynamic variable. Its syntax is {{$randomInt [min max]}}, where min and max are optional parameters that specify the minimum and maximum values for the generated integer.
Here are a few examples of using $randomInt in a Visual Studio .http file.
GET https://localhost:5001/api/products/{{$randomInt}}Visual Studio generates a random integer and replaces {{$randomInt}} with the generated value.
GET https://localhost:5001/api/products/42Generate a random integer within a range:
GET https://localhost:5001/api/products/{{$randomInt 1 100}}This generates a random integer between 1 and 100.
GET https://localhost:5001/api/products/73- $datetime generates a datetime string in UTC.
- $localDatetime generates a datetime string in the local time zone.
- $timestamp generates a timestamp in UTC.
Example:
GET https://localhost:5001/api/orders?createdAt={{$datetime}}It might produce:
GET https://localhost:5001/api/orders?createdAt=2026-08-15T13:20:30ZThe link to download the full source code of this tutorial is given below:
Overall, .http files are an effective tool for API development, debugging, automated test scenarios, and sharing reproducible HTTP requests with your development team. By using environment files and secure secret providers appropriately, you can keep your API testing workflow both flexible and secure.
SHARE THIS ARTICLE


Related Tutorials:




ABOUT THE AUTHOR
I hope you enjoyed reading this tutorial. If it helped you then consider buying a cup of coffee for me. This will help me in writing more such good tutorials for the readers. Thank you.

HELLO EVERYONE
 Welcome to YogiHosting - A Programming Tutorial Website. It is used by millions of people around the world to learn and explore about ASP.NET Core, Blazor, jQuery, JavaScript, Docker, Kubernetes and other topics.
SUBSCRIBE TO NEWSLETTER
Enter your email address to subscribe to this blog and receive notifications of new posts by email.
Join 90K other subscribers