Kubernetes Persistent volumes (PV) and Persistent Volume Claim (PVC)
 and Persistent Volume Claim (PVC)")
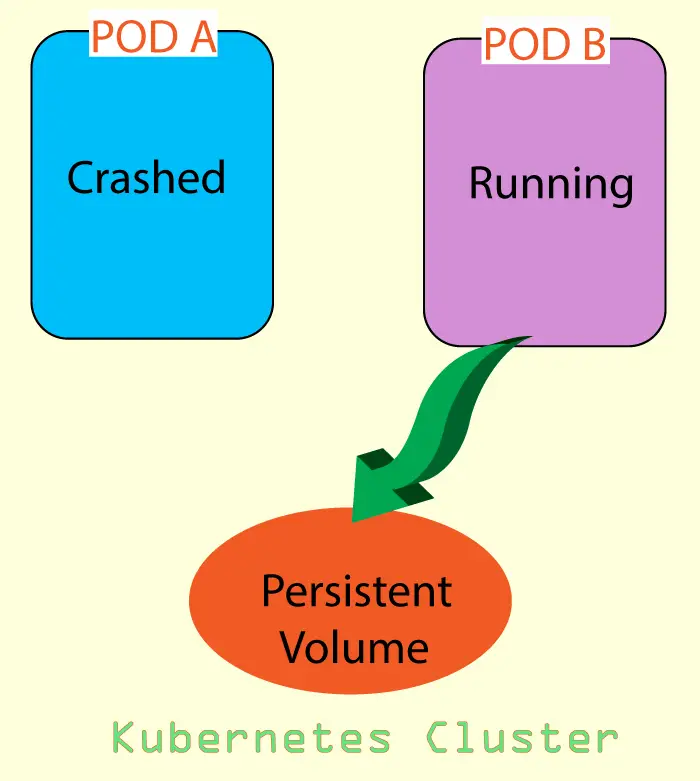
In this ASP.NET Core Kubernetes tutorial we will be using Persistent Volumes (PV) as storages in the cluster, these are persistent in nature. The PV has a lifecycle independent of any individual pod which is using the PV. A Persistent Volume remains outside the Pod unlike emptyDir volume (emptyDir remains inside the Pod) so even if a Pod crashes there is no risk of the volume getting ruined.
ASP.NET Core Kubernetes series consists of the following articles:
- Deploy ASP.NET Core App on Kubernetes
- Managing ASP.NET Core app hosted on Kubernetes
- How to use Kubernetes Ingress on an ASP.NET Core app
- Kubernetes: Host Multi-Container ASP.NET Core app to Single Pod
- Kubernetes: Host Multi-Container ASP.NET Core app to Multiple Pods
- Kubernetes Volume emptyDir and SSL Mount to volume
- Kubernetes Persistent volumes (PV) and Persistent Volume Claim (PVC)
- Kubernetes Liveness Readiness Startup Probes
- How to use Helm for ASP.NET Core with Kubernetes
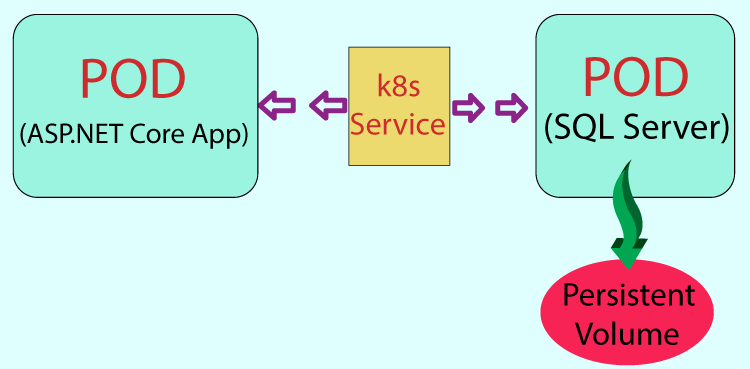
Suppose there is a Pod A which is using some data kept in a Persistent Volume. Now due to some exception the Pod A crashes, so Kubernetes will create a new Pod B and this Pod B will take the place of Pod A.
Now comes the part of Persistent Volume (PV). Since the data is in Persistent Volume therefore it remains safe and new Pod B will use the data from the Persistent Volume. Therefore, everything will keep on running fine.
The below illustration explains the working of PV.
Page Contents
Persistent Volumes Claim
A Persistent Volumes Claim is a request to Kubernetes to provide a storage of a certain size (like some GBs) and certain access mode.
Persistent Volumes Claim is like a bank where a person goes and ask for a cash payment for some amount like $10k or $1 million. It is now upto the bank to provide the person with that much money in cash. The person is making a request to the bank and the bank is fulfilling the request.
If you are working in your local kubernetes cluster then the Persistent Volumes Claim will be fulfilled on your local hard disk space. In simple terms you can say the Persistent Volume will be somewhere in the hard disk of your pc.
If you are using a Cloud Provider like Azure, Google Cloud, AWS, etc then Kubernetes will fulfil the Persistent Volumes Claim on the cloud storage. For example, Azure has Azure Disk and Azure File for Persistent Volume. Similarly Google Cloud has gcePersistentDisk.
Creating Persistent Volume Claim locally
Let us now create a Persistent Volume Claim on our local k8s cluster. The below configuration file will create a PVC by the name of mssql-pvc.
apiVersion: v1
kind: PersistentVolumeClaim
metadata:
  name: mssql-pvc
spec:
  accessModes:
    - ReadWriteOnce
  resources:
    requests:
      storage: 1Mi
The PVC config yaml file should have apiVersion: v1 and kind: PersistentVolumeClaim.
I have named the Persistent Volume Claim as mssql-pvc.
metadata:
  name: mssql-pvc
I have specified the access mode for the PVC as ReadWriteOnce. Access Modes specify how the Persistent Volume will be mounted and accessed by the Pod.
accessModes:
  - ReadWriteOnce
Access Modes are of 3 types:
- ReadWriteOnce – the persistent volume can be read and write by only a single worker node at a time.
- ReadOnlyMany – the persistent volume can be read (but not write) by multiple worker nodes at a time.
- ReadWriteMany – the persistent volume can be read and write by multiple worker nodes at a time.
Then coming to the storage. I have asked kubernetes for a storage of just 1 Mb. See below.
resources:
    requests:
      storage: 1Mi
If you want the storage in GB then specify it like:
resources:
    requests:
      storage: 10Gi
Note: Use terms “Gi” for specifying GB and “Mi” for specifying MB.
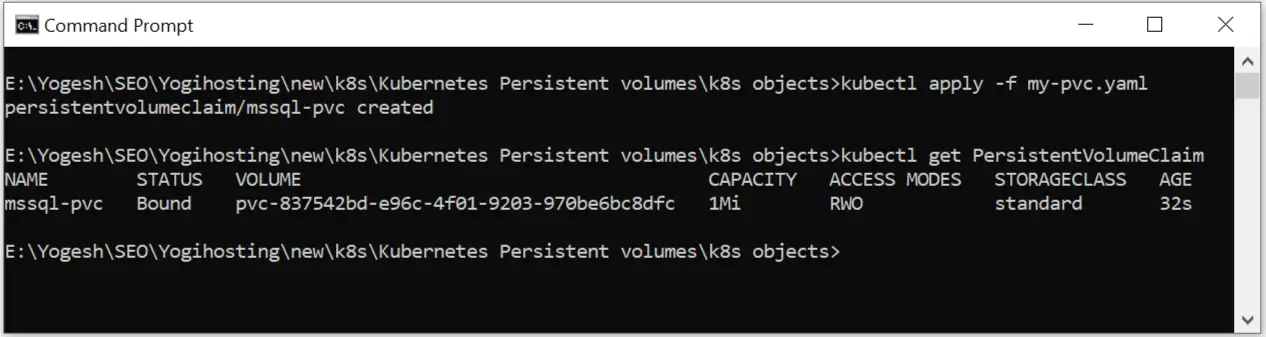
Now apply this PersistentVolumeClaim to kubectl, the command is:
kubectl apply -f my-pvc.yamlName of this file is my-pvc.yaml.
Next run the kubectl get PersistentVolumeClaim command which will shown you this PVC is created in your cluster.
Creating SQL Server Deployment with Persistent Volume
Now it’s time to create an SQL Server Deployment that has Persistent Volume to store the database data. This deployment will call for the Persistent Volume Claim I just created i.e. mssql-pvc to provide a Persistent Volume on the disk for storing the data.
The deployment file called sql-dep.yaml which is given below creates the SQL Server deployment. See the highlighted code where I have configured the Persistent Volume.
apiVersion: apps/v1
kind: Deployment
metadata:
  name: mssql-deployment
spec:
  replicas: 1
  selector:
     matchLabels:
       app: mssql
  template:
    metadata:
      labels:
        app: mssql
    spec:
      containers:
      - name: mssql
        image: mcr.microsoft.com/mssql/server:2022-latest
        ports:
        - containerPort: 1433
        env:
        - name: MSSQL_PID
          value: "Developer"
        - name: ACCEPT_EULA
          value: "Y"
        - name: MSSQL_SA_PASSWORD
          value: "vV5r9tn0M4@"
        volumeMounts:
        - name: mssqldb
          mountPath: /var/opt/mssql/data
      volumes:
      - name: mssqldb
        persistentVolumeClaim:
          claimName: mssql-pvc
This deployment creates a container by the name of mssql and downloads SQL Server 2022 image from Microsoft Container Registry (mcr). It also exposes port 1433 of the container.
SQL Server Database Engine listens on TCP port 1433 by default and so port 1433 of the container is opened.
containers:
- name: mssql
  image: mcr.microsoft.com/mssql/server:2022-latest
  ports:
  - containerPort: 1433
Next, I added environment variable with the env field. These are given below:
env:
- name: MSSQL_PID
  value: "Developer"
- name: ACCEPT_EULA
  value: "Y"
- name: MSSQL_SA_PASSWORD
  value: "vV5r9tn0M4@"
The MSSQL_SA_PASSWORD is for SQL Server password which I set as vV5r9tn0M4@. You can change it if you want.
After that there is containers.volumeMounts field where the name of the volume and mount path is defined. I have added the volume name as “mysqldb”, I will also need to add this volume to the config file.
The mount path is defined to be /var/opt/mssql/data. This is the path inside the container where the volume will be mounted. Note that the volume is a Persistent Volume which will be stored somewhere on the hard disk and will be safe from both Pod and Container crashes.
volumeMounts:
- name: mssqldb
  mountPath: /var/opt/mssql/data
Next, I added the volume by the name of mssqldb. See below:
volumes:
- name: mssqldb
  persistentVolumeClaim:
    claimName: mssql-pvc
The most important thing is that I defined persistentVolumeClaim field and the name of the claim which is mssql-pvc. This tells kubernetes the Persistent Volume should be fulfilled as requested by the persistentVolumeClaim called mssql-pvc.
Now, in your command prompt, navigate to the folder containing this config file and apply it to Kubernetes. The command is given below:
kubectl apply -f sql-dep.yamlNow run the kubectl get pods command and you can see a Pod is created which is running the container that is containing SQL Server image.

So, now our SQL Server is running from a Kubernetes Pod inside a container. I have shown this in the below given image:
")
Create a Service to expose the SQL Server Pod
I will need a kubernetes service which will expose the SQL Server Pod to other internal objects of Kubernetes. I have illustrated this service in the below given image:
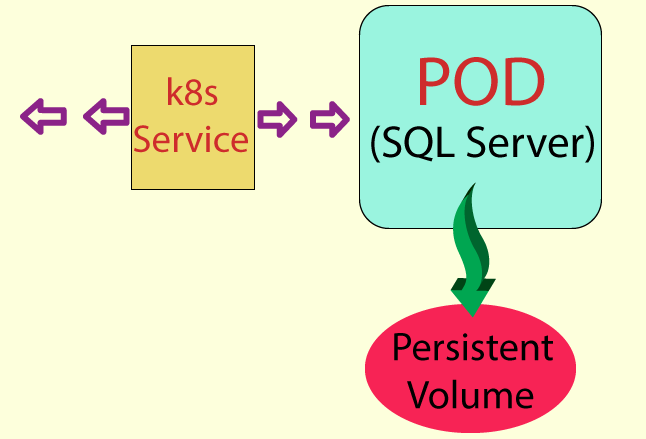
To be precise, I will create another Pod that will hold my database driven ASP.NET Core app. This new Pod will call this kubernetes service in-order to perform database transactions.
The yaml file of the service is given below:
apiVersion: v1
kind: Service
metadata:
  name: mssql-service
spec:
  selector:
    app: mssql
  type: NodePort
  ports:
    - protocol: TCP
      port: 1433
      targetPort: 1433
This service has:
- Name called mssql-service.
- Selector filed value is set as app: mssql. This is the same for the “labels” field ging on the sql-dep.yaml file. So this service is applied for the sql server pod.
- The port no 1433 is opened in the service and is configured for the target port of 1433 for the sql server container.
Now apply this service to kubernetes by running the following command:
kubectl apply -f sql-service.yamlNow I will move to the database app creation task.
Creating Database driven App in ASP.NET Core
You will now have to create an app in ASP.NET Core that will use this SQL Server container image running in the Pod for storing records. You can use any database driven app for the matter, only thing that is needed is that the app should be connected to the Pod running the SQL Server container image.
I have provided this ASP.NET Core app in the source code which you can download (download link at the bottom). In this app I am doing CRUD operations on a SQL Server database for various movie. The movie records are stored on the SQL Server database through Entity Framework Core. I have also added Docker Compose to this app, so you will have to build an image of this app using docker-compose build. We will come to this in just a moment.
In the app I have added the connection string inside the appsettings.json file. It’s code is given below.
{
  "ConnectionStrings": {
    "DefaultConnection": "Data Source=mssql-service,1433;Initial Catalog=MovieDB;Persist Security Info=True;User ID=SA;Password=vV5r9tn0M4@;TrustServerCertificate=true;"
  }
}
Notice the data source value is given mssql-service,1433. The mssql-service is the name of the k8s service which we created before and it’s port number is specified to be 1433. This service will be called by the app in order to access the SQL Server which is running in another Pod.
I have also mentioned the database name as MovieDB. I will be creating this database on the SQL Server with Entity Framework Core migration commands in just a moment.
I consider that you may have downloaded the app so let us proceed with the image creation part.
The apps docker-compose.yml file is given below. The image name defined there is “crudapp”.
version: '3.4'

services:
  dockercrud:
    image: ${DOCKER_REGISTRY-}crudapp
    build:
      context: .
      dockerfile: DockerCrud/Dockerfile
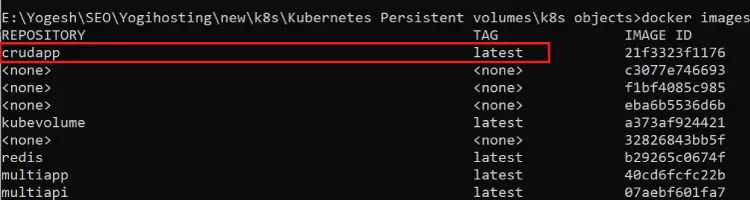
Run the docker-compose build command from the directory of the docker-compose.yml. The command is given below:
docker-compose buildNow run docker images command which will show this image called crudapp created in the docker instance. Check the below image.
Run ASP.NET Core app from Kubernetes Pod
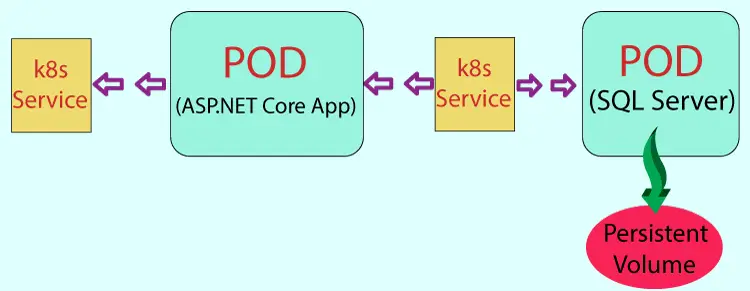
I will now create a new Pod that will run my ASP.NET Core containerized app which is database driven and perform CRUD operations on a SQL Server which is running in another container. What this architecture looks like is shown by the below given image:
So, create a deployment file by the name of app-dep.yaml. It’s given below:
apiVersion: apps/v1
kind: Deployment
metadata:
  name: crud-deployment
  labels:
    app: crud-app
spec:
  replicas: 1
  selector:
    matchLabels:
      app: crud
  template:
    metadata:
      labels:
        app: crud
    spec:
      containers:
        - name: crudcontainer
          image: crudapp
          imagePullPolicy: Never
          ports:
            - containerPort: 8080
I have named this deployment as “crud-app”. Inside the containers field, I have specified the name of the container which is crudcontainer and the image this container will run – crudapp.
containers:
  - name: crudcontainer
    image: crudapp
The image pull policy is set to never as the image is inside the docker, otherwise docker will try to download this image from docker hub (which should not be the case for us).
imagePullPolicy: NeverI also have specified the container port 8080 to be opened since Dockerfile has Exposed this port. Open Dockerfile of this app to find this port.
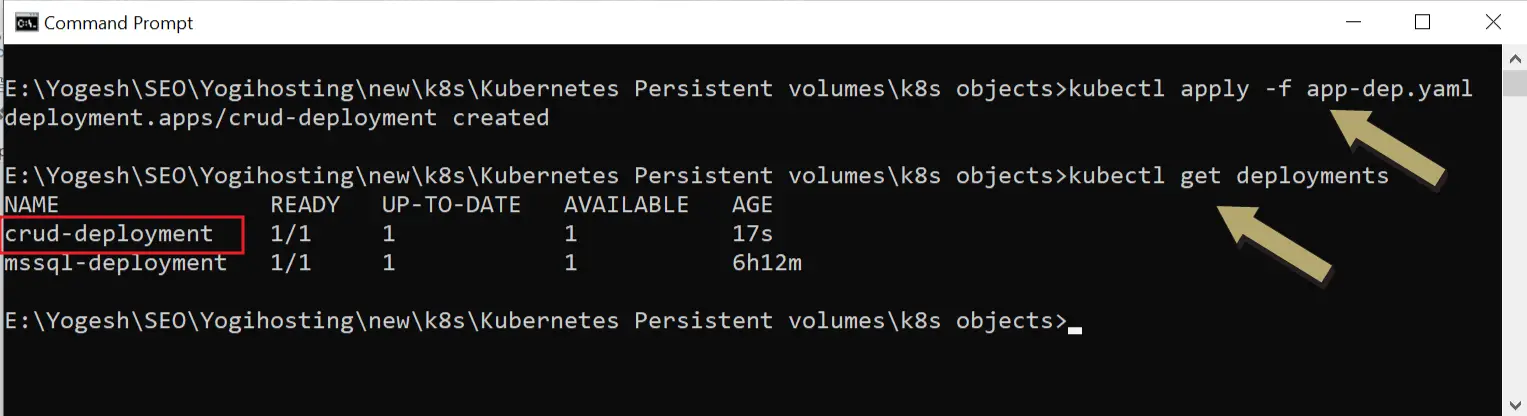
containerPort: 8080Now let us apply this deployment to kubernetes. The command to run is:
kubectl apply -f app-dep.yamlNext, run the kubectl get deployments to find this newly created deployment.
Finally, I will need to create a service to expose the Pod running the ASP.NET Core CRUD app. So we can open the app on the browser with this service. I have shown this new service in the below illustrations.
The service yaml file is given below:
apiVersion: v1
kind: Service
metadata:
  name: crudapp-service
spec:
  selector:
    app: crud
  type: NodePort
  ports:
    - protocol: TCP
      port: 9999
      targetPort: 8080
There is no special thing except that this service is going to target port 8080 of the Pod running the app and exposes it’s port 9999 to the host.
Apply this service to kubernetes by the below command:
kubectl apply -f app-service.yamlThis service file has the name of “app-service.yaml”.
So now we have:
- Two Pods – one running sql server and other running CRUD app.
- Two Services – one for communicating with the sql server pod and other for exposing CRUD app on the browser.
Let us now perform entity framework core migrations and access our app.
Applying Entity Framework Core Migrations
The SQL Server is ready on the Pod but the database isn’t. So, I must perform Entity Framework Core Migrations which will create the database “MovieDB” in the SQL Server.
So, first select the app as Set as Startup Project instead of docker-compose project selected as startup project. Now, from the Package Manager Console window in Visual Studio create the migrations. The command to run is:
add-migration Migration1If you now check your solution explorer you will find a Migrations folder is created.
Pay attention, you may be running the update migrations command in your EF core based project which apply migration on the database. But this command will not run here.
The command which I am talking about is given below:
Update-DatabaseThe reason why you cannot apply this command is because the SQL Server is not exposed to the outside world it is only exposed to a Kubernetes Service.
But there is another way to do this, it is through C# code. You can run the below code in C# and this will apply the migrations on the database.
DbContext.Database.Migrate();In the ASP.NET Core app, open the HomeController.cs file add RunMigrate() method whose code is given below:
public IActionResult RunMigrate()
{
    context.Database.Migrate();
    return RedirectToAction("Index");
}
So what I will do next is open the app on the browser and navigate to the URL – /Home/RunMigrate and this will call this method RunMigrate().
Recall the service “crudapp-service” is exposing the CRUD app on the browser. So run the command kubectl get services on the command prompt to find it’s address and port.

In my case the url is http://localhost:32075/. When I open it on the browser I get Http Error 500 because database is not created yet. See below image:

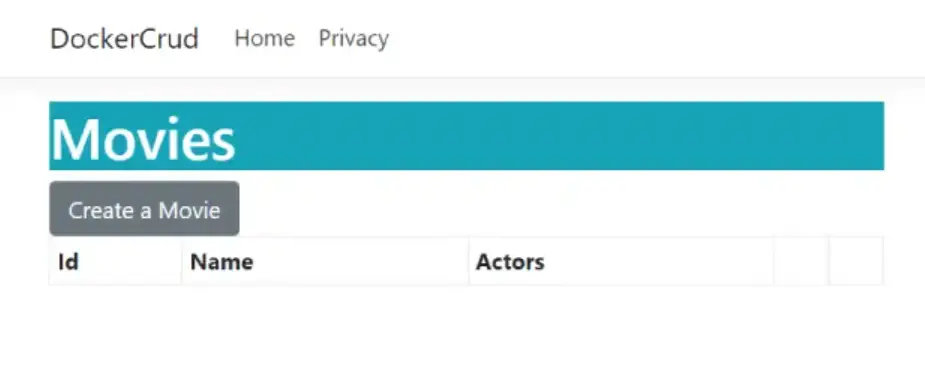
Now I open the URL – http://localhost:32075/Home/RunMigrate and this will apply the migrations and so the database is created and we are happy to perform CRUD operations.
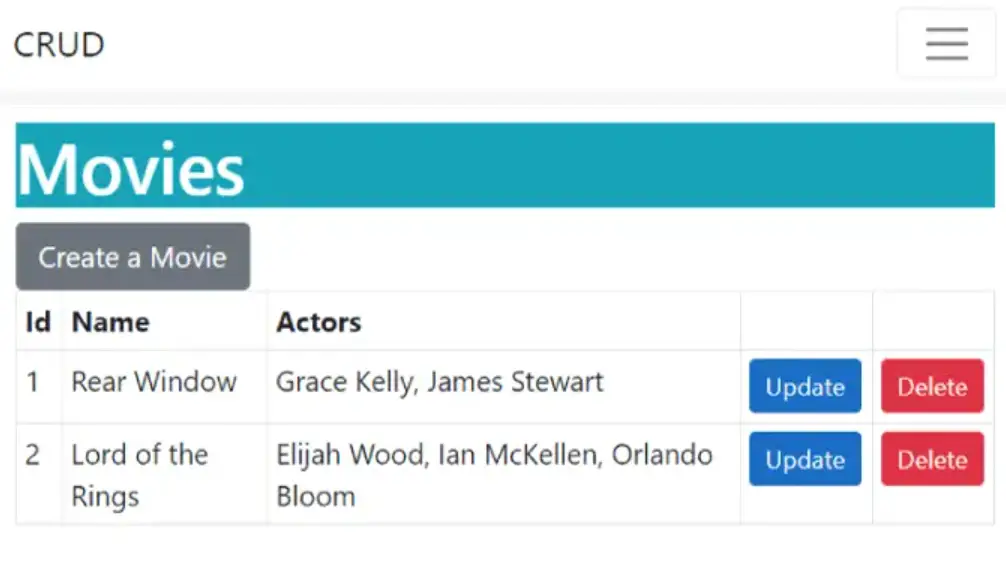
You will be redirected to the Index view of the Home controller. Here you will see an empty table (which means no movie are in the database) and create movie link. See the below image.
I created 2 movie records and these movie records are stored in my sql server which is running inside a Pod.
You can check the other CRUD features if you want. The point here is that the movie records are getting stored in the SQL Server database which is running inside the Pod.
Next, let us check if the Persistent Volume is working or not.
Checking if Persistent Volume is working
If I delete the SQL Server Pod then Kubernetes will create a new Pod and SQL Server will now run from this new Pod. Since I am using Kubernetes Persistent Volume therefore the SQL database data will be safe and I should see the 2 movie records which I created before.
Let us delete the Pod. Run the below command to find the running pods:
kubectl get podsNext run the delete pod command to delete the sql server pod.
kubectl delete pod mssql-deployment-5fbdb74d78-5csznNow check the new sql server pod to confirm it is indeed a new Pod. You can check the Pod name to confirm this.
kubectl get podsI have shown this in the below image:

Refresh the browser and you will see both the movie records which confirms the Persistent Volume is working as it should be.
Storage Classes
You can define storage platform with Storage Classes and then in your PersistentVolumeClaim (PVC) you refer to a StorageClass by name.
You can see all the storageclass by the following command:
kubectl get storageclass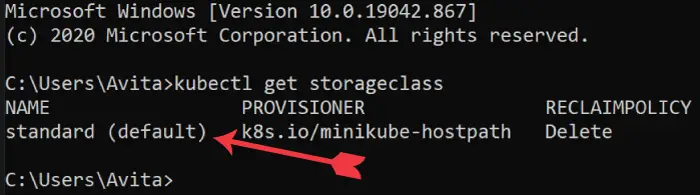
There is only one storage class standard and it is the default one. When I created the PVC I did not mention any storage class so default one will automatically be applied.
On a cloud platform like Azure you have to add a storage class on Azure Kubernetes Services (AKS) and then in the PVC you use the storage. Let us see an example explaining how to do it.
The Azure Disk storage class yaml file is shown below:
kind: StorageClass
apiVersion: storage.k8s.io/v1
metadata:
     name: azure-disk
provisioner: kubernetes.io/azure-disk
parameters:
  storageaccounttype: Standard_LRS
  kind: Managed
Next, on the PVC, use this storage class as shown by the highlighted code:
apiVersion: v1
kind: PersistentVolumeClaim
metadata:
  name: mssql-pvc
  annotations: volume.beta.kubernetes.io/storage-class: azure-disk
spec:
  accessModes:
    - ReadWriteOnce
  resources:
    requests:
      storage: 10Gi
Secrets in Kubernetes
Kubernetes Secrets let you store and manage sensitive information, such as passwords, OAuth tokens, and ssh keys. In the sql server deployment yaml file, I have added the password for the database in plane text. I will now store that password in a secret and then use that secret so that no body can see the password anymore.
So, run the below given command which will create a secret called mssql. This secret will have a key called SA_PASSWORD which will be storing the password for the database.
kubectl create secret generic mssql --from-literal=SA_PASSWORD="vV5r9tn0M4@"Now update your sql server deployment to use this “secret and the key” to get the password for the database. I have shown the updated codes to be changed, see below:
apiVersion: apps/v1
kind: Deployment
metadata:
  name: mssql-deployment
spec:
  replicas: 1
  selector:
     matchLabels:
       app: mssql
  template:
    metadata:
      labels:
        app: mssql
    spec:
      containers:
      - name: mssql
        image: mcr.microsoft.com/mssql/server:2022-latest
        ports:
        - containerPort: 1433
        env:
        - name: MSSQL_PID
          value: "Developer"
        - name: ACCEPT_EULA
          value: "Y"
        - name: MSSQL_SA_PASSWORD
          valueFrom:
            secretKeyRef:
              name: mssql
              key: SA_PASSWORD
        volumeMounts:
        - name: mssqldb
          mountPath: /var/opt/mssql/data
      volumes:
      - name: mssqldb
        persistentVolumeClaim:
          claimName: mssql-pvc
Now apply this deployment to kubectl once again and everything should work fine.
Download the source codes:
In this ASP.NET Core Kubernetes Persistent Tutorial I covered both Persistent Volumes and Persistent Volume Claims. I created a SQL Server deployment and ran SQL Server from a Pod. I also used Persistent Volume for storing SQL Data on the Persistent Volume so that the data survives pod crashes. In the last we covered Secrets in Kubernetes. I hope you like this tutorial, please share it on your social accounts. Thank you.
SHARE THIS ARTICLE
Related Tutorials:


ABOUT THE AUTHOR
I hope you enjoyed reading this tutorial. If it helped you then consider buying a cup of coffee for me. This will help me in writing more such good tutorials for the readers. Thank you.

Comments
Leave a Reply
HELLO EVERYONE
 Welcome to YogiHosting - A Programming Tutorial Website. It is used by millions of people around the world to learn and explore about ASP.NET Core, Blazor, jQuery, JavaScript, Docker, Kubernetes and other topics.
SUBSCRIBE TO NEWSLETTER
Enter your email address to subscribe to this blog and receive notifications of new posts by email.
Join 90K other subscribers
Hi, thanks for the tutorial! I just have a doubt regarding the migrations. Have I to perform the migration and after that I recreate the application image in .NET and upload it in Kubernetes? What happens is that I had my migrations ready, I configured the part of the ConnectionStrings as samples and deployed the image in Kubernetes, but when I access I get an error that says: Cannot open database requested by the login. The login failed. Thanks!
You have to apply the migrations by executing c# code `context.Database.Migrate();`. Make a controller (which does not call the database), then create an action method on it containing this c# code. When you call the action method url on the browser the c# code will run and so the migrations will apply.