Kubernetes Volume emptyDir and SSL Mount to volume

We will now learn ASP.NET Core Kubernetes Volume and how to Mount SSL Certificates to Volume. A Kubernetes Volume is a directory, containing some files, which is accessible to all containers in a Pod. Files to this directory can be mounted from outside the Pod and so if the Pod or Containers crash then also this directory and it’s contents remain safe.
ASP.NET Core Kubernetes series consists of the following articles:
- Deploy ASP.NET Core App on Kubernetes
- Managing ASP.NET Core app hosted on Kubernetes
- How to use Kubernetes Ingress on an ASP.NET Core app
- Kubernetes: Host Multi-Container ASP.NET Core app to Single Pod
- Kubernetes: Host Multi-Container ASP.NET Core app to Multiple Pods
- Kubernetes Volume emptyDir and SSL Mount to volume
- Kubernetes Persistent volumes (PV) and Persistent Volume Claim (PVC)
- Kubernetes Liveness Readiness Startup Probes
- How to use Helm for ASP.NET Core with Kubernetes
Kubernetes has 2 main types of Volume:
- Ephemeral Volume – Ephemeral volume types are located inside the Pod and so they have a lifetime of a Pod. They can survive a container crashes but when the Pod crashes then Ephemeral volume is lost.
- Persistent Volume – Persistent volume types are located outside of the Pod and they survive in the event of a Pod crash.
In this tutorial we will look into kubernetes emptyDir Volume which is an Ephemeral Volume type. In the next tutorial we will look into Persistent Volume.
Page Contents
Configure Pod to use “emptyDir” Volume for Storage
Now we will take a look to Kubernetes emptyDir Volume and how to configure it for a Pod. As a reminder the emptyDir volume is Ephemeral in nature i.e. it has a life time same as that of a Pod. So, if the Pod goes down, crashes or restarts, then the emptyDir volume is lost forever.
I have my ASP.NET Core MVC APP ready with Docker Support. It is a very simple app which has a Dockerfile added to it. You don’t have to go into details of how this app is created, you just have to know it is a simple app and has a Dockerfile added to it. I have provided this app in the source code of this tutorial. The download link to this source code is given at the bottom of this tutorial. So just download the source code and proceed.
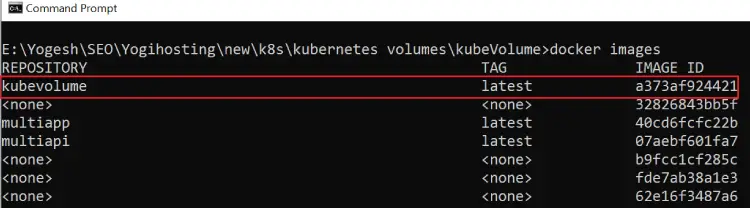
In the command prompt, navigate to the directory of Dockerfile and run the docker build command which is given below.
docker build -t kubevolume -f Dockerfile .I have named the image as kubevolume. Run the docker images command and you will find this image. See the below image where I have marked it.
The docker image is ready, the next thing I have to do is to create a deployment.
So, create a deployment config file having the following code (see below). On downloading the source code, you will find this config file by the name of mydep.yaml inside the Kubernetes folder.
apiVersion: apps/v1
kind: Deployment
metadata:
  name: kube-volume
  labels:
    app: kube-volume-app
spec:
  replicas: 1
  selector:
    matchLabels:
      component: web
  template:
    metadata:
      labels:
        component: web
    spec:
      containers:
        - name: ckubevolume
          image: kubevolume
          imagePullPolicy: Never
          ports:
            - containerPort: 8080
          volumeMounts:
            - name: foo
              mountPath: "/app/foo"
      volumes:
        - name: foo
          emptyDir: {}
Notice the highlighted code given above where I did the kubernetes volume configurations. The volumes to provide for the Pod is given in the spec.volumes field.
Where to mount those volumes into containers is given inside the .spec.containers.volumeMounts field. The name field value for “volumeMounts” and “volumes” should be same. I named them “foo”, you can name them anything of your choice.
The emptyDir: {} tells kubernetes that the volume type to use is emptyDir. The mountPath is provided with a value of /app/foo, so kubernetes will created “foo” folder inside the “app” folder in the container, and this “foo” folder has a life time same as that of the Pod.
Now apply this deployment by navigating to the directory where this deployment file is kept and running the apply command given below:
kubectl apply -f mydep.yamlNext, run the kuectl get pods command to find this newly created pod.
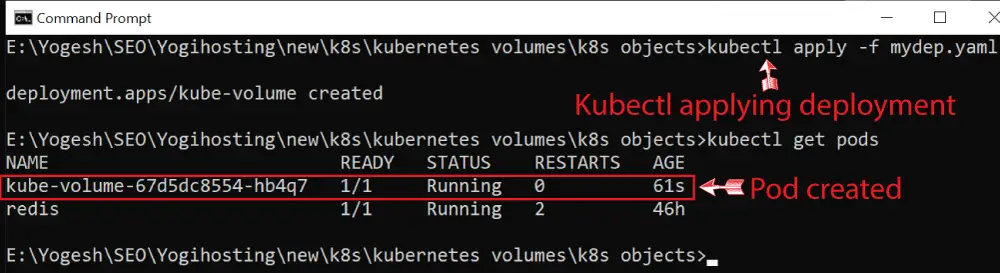
The pod by the name kube-volume-67d5dc8554-hb4q7 is created.
Example: “emptyDir” Volume Lifecycle
I will now create a file inside the container running in the Pod. Next, I will check whether the file remains available when:
- 1. The container crashes.
- 2. The pod crashes.
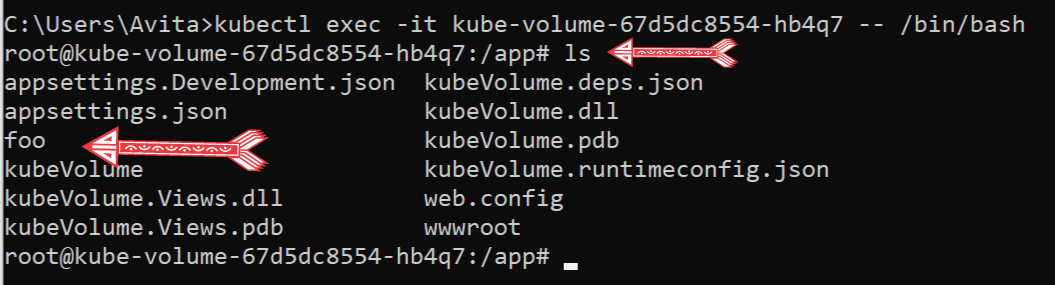
So, get a shell to the container by running the following command given below. Note that your Pod name will be different so change the command by including the name of your pod:
kubectl exec -it kube-volume-67d5dc8554-hb4q7 -- /bin/bashNext, in the shell, run the ls command to see all the folder and files inside the container. You will see the foo folder which is created by the “volume mountPath” is also present there. I have shown this folder in the below image:
Next, I create a file called test inside the “foo” folder. So, I navigate inside this folder with the following command:
cd fooThen I create a test file containing “Hello” text by the command:
echo Hello > testThen with the ls command I confirm this file is created. Check the image:

Now let us check if the test file remains alive in the events of container crash and pod crash.
Container crash can happen for a variety of reasons. When the container crashes the container is deleted and a new container is started by Kubernetes.
I will use docker kill command to kill the container running inside the pod. Kubernetes will then create a new container that will take it’s place.
So, first exit the shell by the exit command. Then run the describe pod command:
kubectl describe pod kube-volume-67d5dc8554-hb4q7In the output you can see the container id.

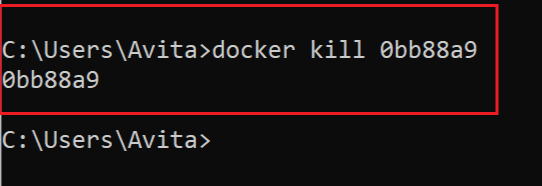
Now kill this container by running docker kill command:
docker kill containeridIn the above command replace containerid with your container id. It is not necessary to enter the full container id, simple enter first 7 letters and kubectl will do your job. Check the below image showing I killed the container by entering it’s first 7 letters of the id:
Now If you run the pod describe command again then you will find a new container has been created. See it’s container id will be different from the previous one which confirms this thing.
Now I go inside the container and check if the test file is available or not. To do this I run the following 3 command.
The first gets a shell to the container.
kubectl exec -it kube-volume-67d5dc8554-hb4q7 -- /bin/bashThe second take me inside the “foo” folder:
cd fooThe third check the contents of the “foo” folder.
lsI just find my test file there. See the below image.

This confirms the emptyDir volume survives container crashes.
Now I will test another scenario by deleting the Pod and then check what happens to the test file. By running the kubectl delete pod command the pod get deleted.
kubectl delete pod kube-volume-67d5dc8554-hb4q7 Kubernetes will create a new pod to replace this crashed pod this new pod will now run our containerized ASP.NET Core app. So there will be no downtime which is incredible.
Run the kubectl get pods command to confirm that the new pod is created. You can check the id is different than the previous pod. I have confirmed this in the below image.

Now get a shell to the container running inside this new pod and check if the file is present. I ran the following 3 command and on checking the test file, I found it is not there.
kubectl exec -it kube-volume-67d5dc8554-lchbp -- /bin/bash
cd foo
ls
This confirms the emptyDir volume is lost on Pod crash. Check the below image where I have shown this thing.

So, what can be the better way to use a Kubernetes volume. This I am going to see in the next section.
Mount SSL Certificate to Kubernetes Volume
Now we will learn how to mount SSL Certificate to a Kubernetes volume. I will also make sure that the SSL Certificate should survive both Container and Pod crashes. This is done by the use of ConfigMaps.
Let start this by generating a self-signed development certificates and then mounting it to the volume using ConfigMaps.
Generate Self-Signed Development Certificate
The command dotnet dev-certs tool creates self-signed development certificates.
I run the below given command to generate a new SSL development certificate.
dotnet dev-certs https -ep %USERPROFILE%\.aspnet\https\aspnetapp.pfx -p mypass123I get message – The HTTPS developer certificate was generated successfully.
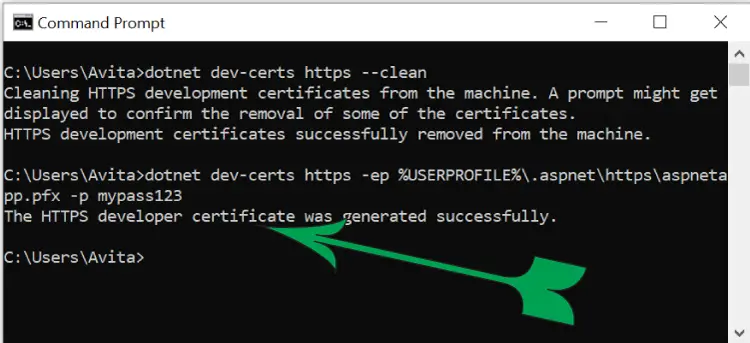
The development SSL called aspnetapp.pfx is created with a password mypass123.
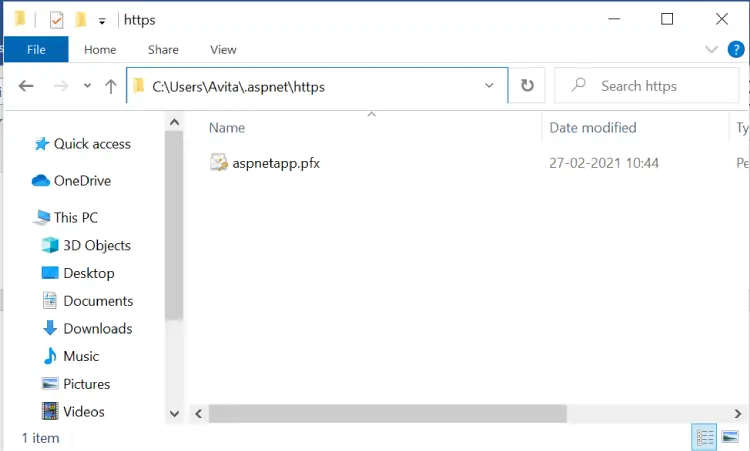
The path of this generated SSL certificate is inside my user profile folder, as I have referred it from %USERPROFILE%\. The full path of the SSL in my case is:
C:\Users\Avita\.aspnet\httpsHere Avita is my windows login name, in your case it will be your pc name. In the below image I have shown the SSL certificate file which is generated on my pc.
Creating a ConfigMap
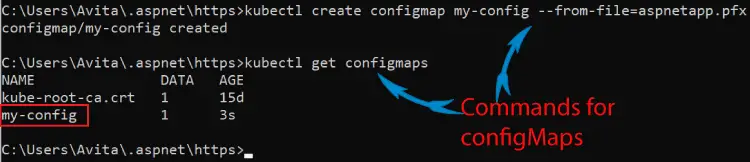
ConfigMaps are kubernetes objects that can store configurations for other objects to use. I will now create a new configMaps by the name of “my-config” and it will store my development certificate which I just generated.
So, in your command prompt run the below shown command from the directory of “aspnetapp.pfx” file.
kubectl create configmap my-config --from-file=aspnetapp.pfxNext run kubectl get configmaps command to verify it is created. Check below screenshot.
Mount file to volume automatically for a new Pod with configMaps
Now I will create a configuration so that whenever a new Pod is created then it should get the SSL file mounted to it’s volume. This thing I will be doing with my newly created configMap.
So, update the deployment yaml file to include configMap in the volumes file as shown highlighted way below.
apiVersion: apps/v1
kind: Deployment
metadata:
  name: kube-volume
  labels:
    app: kube-volume-app
spec:
  replicas: 1
  selector:
    matchLabels:
      component: web
  template:
    metadata:
      labels:
        component: web
    spec:
      containers:
        - name: ckubevolume
          image: kubevolume
          imagePullPolicy: Never
          ports:
            - containerPort: 8080
          volumeMounts:
            - name: ssl
              mountPath: "/app/https"
      volumes:
        - name: ssl
          configMap:
            name: my-config
I am telling that the kubernetes volume is to be provided with “my-config” which is the name of the configMap. The volume mount will be done on the https folder given inside the root folder called “app”.
Now in your command prompt, go to the directory of this yaml file and apply it to k8s:
kubectl apply -f mydep.yamlSince this deployment is changed therefore kubernetes will kill the old pod and create a new pod with the configurations as specified in the yaml file. I can get this new pod name by running the kubectl get pods command.
Now it’s time to confirm the presence of the ssl certificate called aspnetapp.pfx inside the container running in the pod.
So, go to the bash/shell and check the “http” folder for the SSL certificate. I found my ssl and I have shown this in the below image.

So it is a great approach to make sure that files are available to Pod everytime and are unaffected by both Pods and Container crashes.
You can also put a whole folder with mulitiple files in the configMaps, the command is:
kubectl create configmap my-config --from-file=myfolderHere the full myfolder will be added to the configMap and so all the files of myfolder will be mounted to the Pod Volume.
Note: You have to run this command form the parent folder of “myfolder”. More than one configMaps can be added to the deployment if the need arises. If you want to update a configMap then simple delete is by using kubectl delete and create a new one. The new configurations of the configMap will not be automatically applied to the Pod. You will need to delete the pod so that a new pod is created by the deployment and it gets the files on the volume mount.
Download the source codes.
In this ASP.NET Core Kubernetes Volume tutorial I covered emptyDir volume which is available only till the life cycle of the Pod, if the Pod dies then it also dies. Later on I created configMaps which will mount files to volume whenever a pod is created so it removes the shortfall of the emptyDir volume.
SHARE THIS ARTICLE
Related Tutorials:


ABOUT THE AUTHOR
I hope you enjoyed reading this tutorial. If it helped you then consider buying a cup of coffee for me. This will help me in writing more such good tutorials for the readers. Thank you.

HELLO EVERYONE
 Welcome to YogiHosting - A Programming Tutorial Website. It is used by millions of people around the world to learn and explore about ASP.NET Core, Blazor, jQuery, JavaScript, Docker, Kubernetes and other topics.
SUBSCRIBE TO NEWSLETTER
Enter your email address to subscribe to this blog and receive notifications of new posts by email.
Join 90K other subscribers