Kubernetes: Host Multi-Container ASP.NET Core app to Single Pod

In this ASP.NET Core Kubernetes Tutorial I will host a Multi-Container ASP.NET Core app to a single Kubernetes Pod. The ASP.NET Core app will have 2 containers and these containers will also communicate with each other. I will show you how this communication will take place inside the Pod.
ASP.NET Core Kubernetes series consists of the following articles:
- Deploy ASP.NET Core App on Kubernetes
- Managing ASP.NET Core app hosted on Kubernetes
- How to use Kubernetes Ingress on an ASP.NET Core app
- Kubernetes: Host Multi-Container ASP.NET Core app to Single Pod
- Kubernetes: Host Multi-Container ASP.NET Core app to Multiple Pods
- Kubernetes Volume emptyDir and SSL Mount to volume
- Kubernetes Persistent volumes (PV) and Persistent Volume Claim (PVC)
- Kubernetes Liveness Readiness Startup Probes
- How to use Helm for ASP.NET Core with Kubernetes
Page Contents
Multi-Container ASP.NET Core app
We will create an ASP.NET Core app that will contain 2 projects. These 2 projects will be contained in 2 separate Docker Containers. Later on these 2 Containers will run inside a single Kubernetes Pod.
These 2 projects are:
- MultiApp – a simple Razor Pages project that will be making an API call to get a random joke. This random joke is then displayed on the browser.
- MultiApi – a Web API project which will be sending this joke to the client in json format.
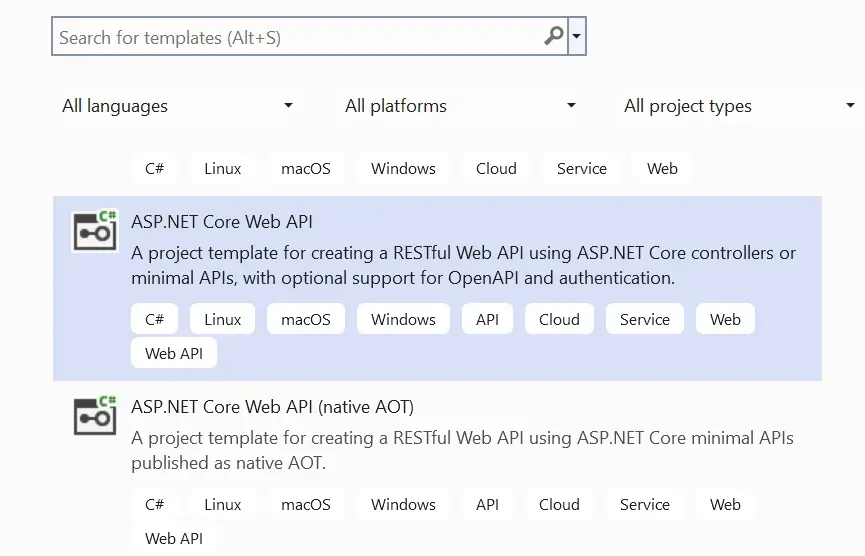
Create a new ASPNET Core Web App (Razor Pages) project in Visual Studio..
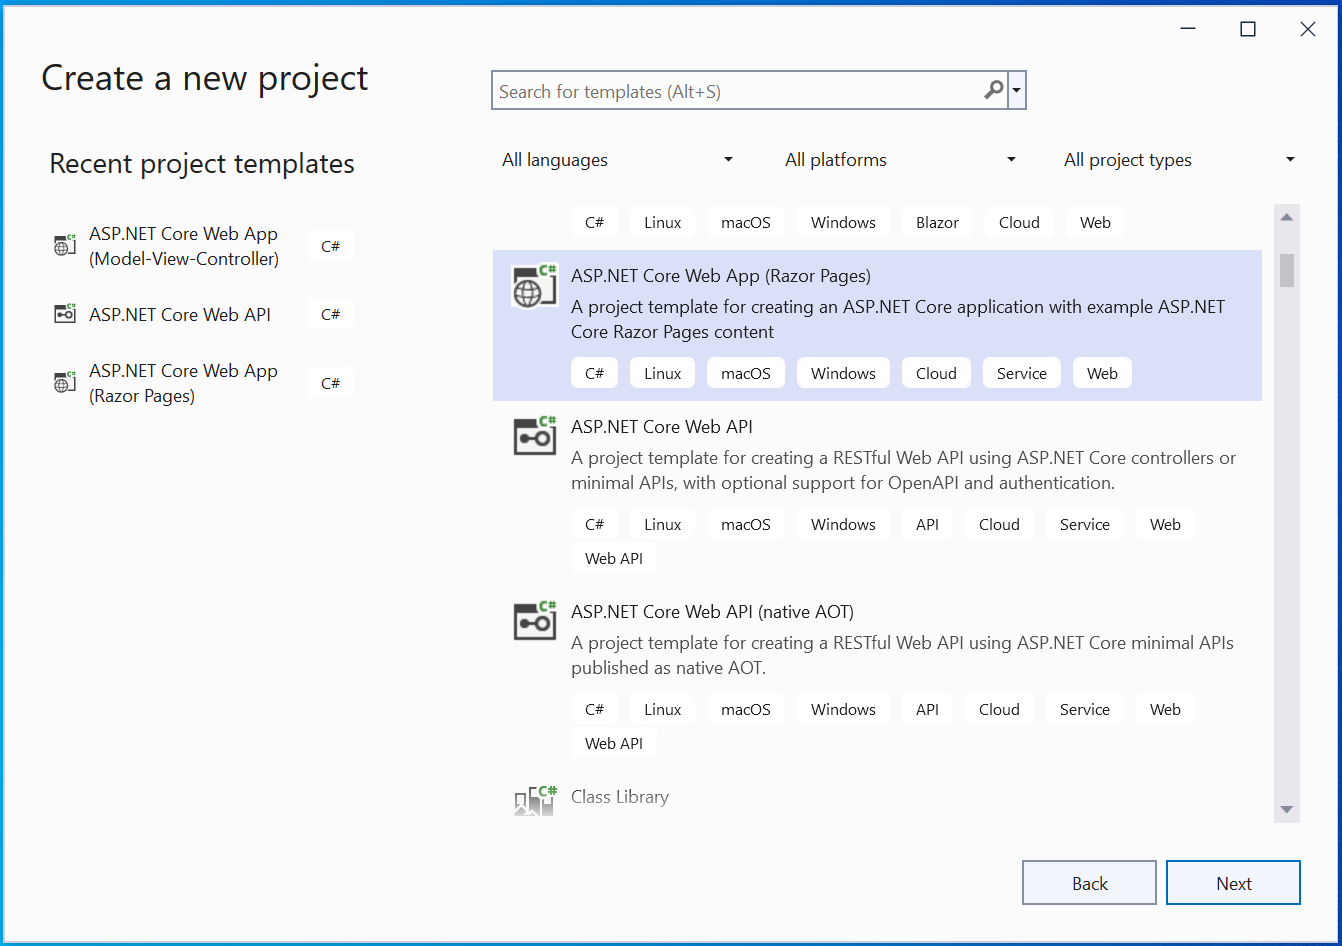
Give your app name – MultiApp, and un-check the option Place solution and project in the same directory.
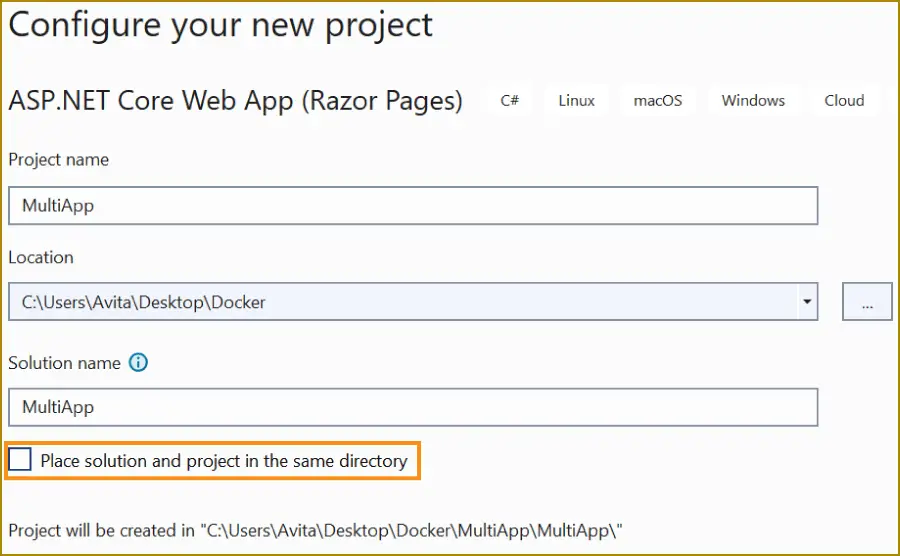
Do not select Enable Docker Support. We will do it later.
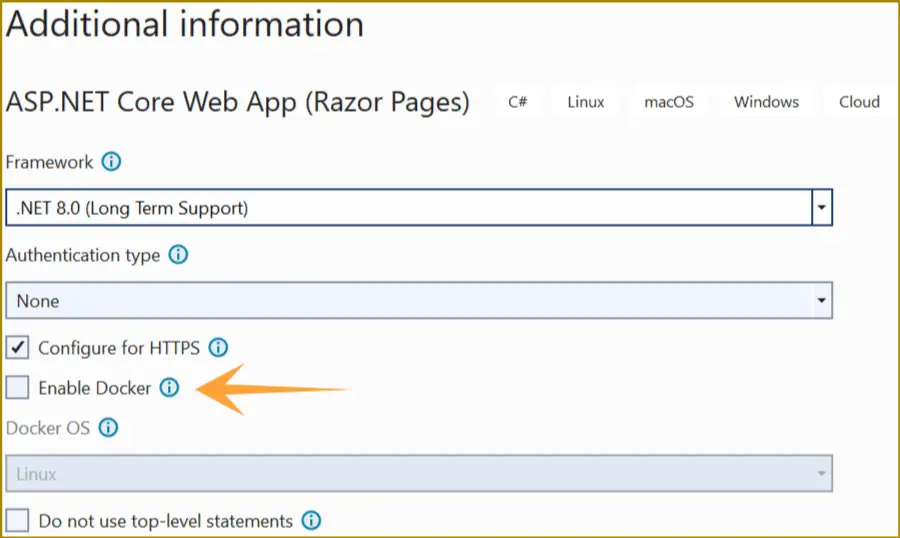
Click “Create” button to create the app.
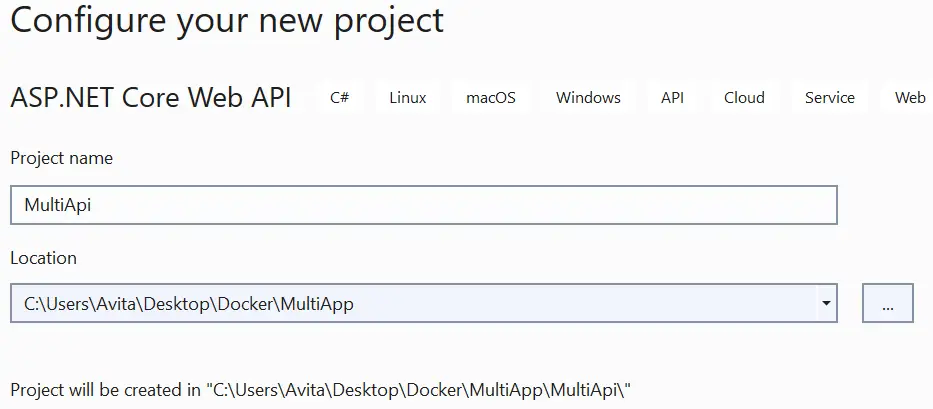
Create a Web API project
Add a new project to the same solution. This is done by right click the solution name in Solution Explorer and select Add >> New Project.
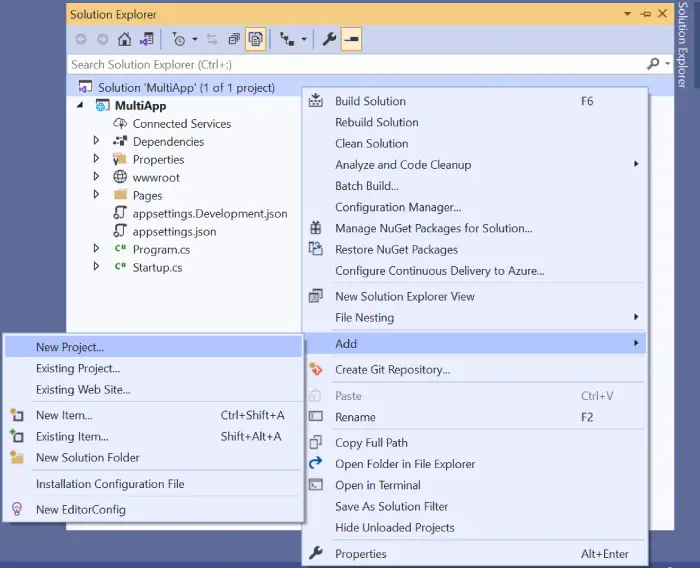
Select ASP.NET Core Web API.
Call it MultiApi.
In the next screen make sure to un-check the checkbox that says – Configure for HTTPS, and click the Create button.
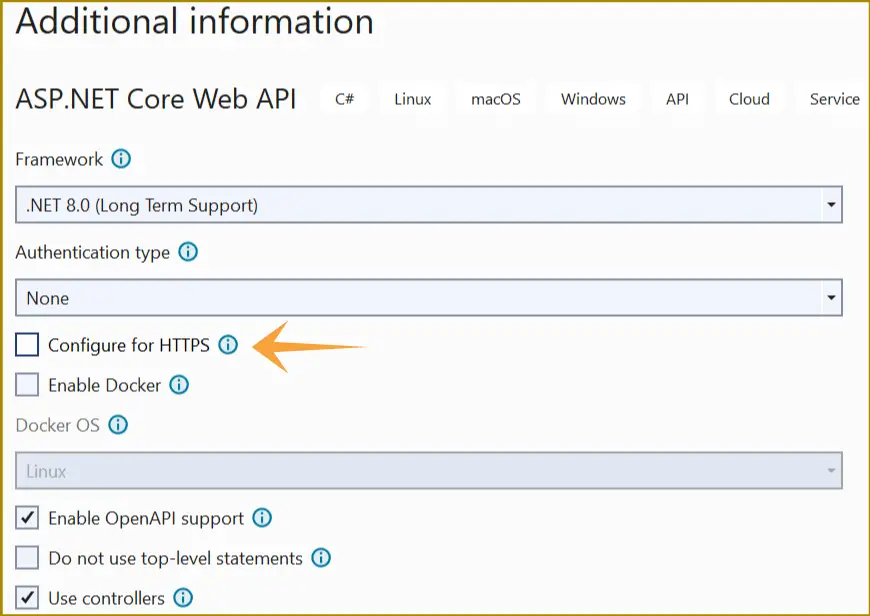
This is done because there is no need for SSL for the communication between Docker Containers.
In the MultiApi project create a new class called Joke.cs with the following code:
namespace MultiApi
{
    public class Joke
    {
        public string Name { get; set; }
        public string Text { get; set; }
        public string Category { get; set; }
    }
}
This class is for the Jokes. The Jokes will be randomly sent to the client that is calling the web api.
Next add a new controller called JokeController.cs inside the Controllers folder with the following code:
using Microsoft.AspNetCore.Mvc;

namespace MultiApi.Controllers
{
    [ApiController]
    [Route("api/[controller]")]
    public class JokeController : ControllerBase
    {
        [HttpGet]
        public Joke Get()
        {
            Random rand = new Random();
            int toSkip = rand.Next(0, 10);
            Joke joke = Repository().Skip(toSkip).Take(1).FirstOrDefault();
            return joke;
        }


        public List<Joke> Repository()
        {
            List<Joke> jokeList = new List<Joke> {
                new Joke {Name = "RATTLE SNAKE", Text = "Two men are hiking through the woods when one of them cries out, “Snake! Run!” His companion laughs at him. “Oh, relax. It’s only a baby,” he says. “Don’t you!", Category="Animal" },
                new Joke {Name = "HORSE RIDER", Text = "To be or not to be a horse rider, that is equestrian. —Mark Simmons, comedian", Category="Animal" },
                new Joke {Name = "POSTURE CAT", Text = "What did the grandma cat say to her grandson when she saw him slouching? A: You need to pay more attention to my pawsture.", Category="Animal" },
                new Joke {Name = "HE CAN DO IT HIMSELF", Text = "It was my first night caring for an elderly patient. When he grew sleepy, I wheeled his chair as close to the bed as possible and, using the techniques I’d...", Category="Dockor" },
                new Joke {Name = "ON THE BADGE", Text = "My 85-year-old grandfather was rushed to the hospital with a possible concussion. The doctor asked him a series of questions: “Do you know where you are?” “I’m at Rex Hospital.”...", Category="Dockor" },
                new Joke {Name = "THE NURSE HAS MY TEETH", Text = "As a brain wave technologist, I often ask postoperative patients to smile to make sure their facial nerves are intact. It always struck me as odd to be asking this...", Category="Dockor" },
                new Joke {Name = "GLUTEN ATTACK", Text = "Guy staring at an ambulance in front of Whole Foods: “Somebody must have accidentally eaten gluten.”", Category="Food" },
                new Joke {Name = "MORNING TEA", Text = "What has T in the beginning, T in the middle, and T at the end? A: A teapot.", Category="Food" },
                new Joke {Name = "MAKE ME A SANDWICH", Text = "My husband and I were daydreaming about what we would do if we won the lottery. I started: “I’d hire a cook so that I could just say, ‘Hey, make...", Category="Marriage" },
                new Joke {Name = "SELL IT", Text = "As my wife and I prepared for our garage sale, I came across a painting. Looking at the back, I discovered that I had written “To my beautiful wife on...", Category="Marriage" }
                };

            return jokeList;
        }
    }
}
There are 2 attributes on the controller which will make it API Controller. These attributes are:
[ApiController]
[Route("api/[controller]")]
This controller is inherited from ControllerBase which is a parent class.
The Web API controller has a HTTP GET method that will return a random joke.
[HttpGet]
public Joke Get()
{
    Random rand = new Random();
    int toSkip = rand.Next(0, 10);
    Joke joke = Repository().Skip(toSkip).Take(1).FirstOrDefault();
    return joke;
}
There are 10 Jokes contained by the Repository method.
public List<Joke> Repository()
{
…
}Open the Index.cshtml.cs page kept inside “Pages” folder of the MultiApp project and change the OnGet() method code to:
public async Task OnGet()
{
    using (var client = new HttpClient())
    {
        var request = new HttpRequestMessage();
        request.RequestUri = new Uri("http://localhost:5255/api/Joke");
        var response = await client.SendAsync(request);
        var joke = await response.Content.ReadAsStringAsync();

        var details = JObject.Parse(joke);
        ViewData["Joke"] = details["name"] + ";;" + details["text"] + ";;" + details["category"];
    }
}
In this method we call the Web API kept in the MultiApi project. Notice the url of the web api – http://localhost:5255/api/Joke. You can get this url by selecting properties of the MultiApi project. Then go to Debug ➤ Open debug launch profiles UI, see below image.

The “JObject” is from Newtonsoft.Json package. Install this package from NuGet. It converts a string containing json to JObject type. After that you can extract the individual values of the json as:
details["name"]
details["text"]
details["category"]
When the Joke is received, it is saved to a ViewData variable so in the Index view I can show the Joke inside an HTML table.
Therefore, edit the Index.cshtml kept inside the Pages folder to include an HTML Table whose code is shown in highlighted way:
@page
@model IndexModel
@{
    ViewData["Title"] = "Home page";
}

<div class="text-center">
    <h1 class="display-4">Welcome</h1>
    <p>Learn about <a href="https://docs.microsoft.com/aspnet/core">building Web apps with ASP.NET Core</a>.</p>
    <table class="table table-sm table-striped table-bordered m-2">
        <thead>
            <tr>
                <th>Name</th>
                <th>Text</th>
                <th>Category</th>
            </tr>
        </thead>
        <tbody>
            <tr>
                <td>@ViewData["Joke"].ToString().Split(";;")[0]</td>
                <td>@ViewData["Joke"].ToString().Split(";;")[1]</td>
                <td>@ViewData["Joke"].ToString().Split(";;")[2]</td>
            </tr>
        </tbody>
    </table>
</div>
Right click the solution name in the solution explorer and select properties. Now select Multiple Startup Project. Then select “Start” for both these project as shown in the below image.

Now run the app in visual studio, you will see a joke displayed on the page.

Create 2 Docker Containers for the App from Docker Compose
Now I will need to create 2 Docker Containers for containing our ASP.NET Core app. The first container will contain “MultiApp” project and the second container will contain the “MultiApi” project. I have illustrated this in the below image.

Next you have to add docker support 2 both these projects. The best way is to do this from Docker Compose. A YAML file called docker-compose.yml will be created, it’s purpose is to tell the docker engine to run this app in 2 containers.
Right click the MultiApp project name on the solution explorer and select Add ➤ Container Compose Support.

Next, you will see a new Container Scaffolding Options dialog. Here keep all the settings as it it and click OK.

In the same way add Add Container Compose Support to the other project – “MultiApi”.
A docker-compose.yml file will be created with the following code:
services:
  multiapp:
    image: ${DOCKER_REGISTRY-}multiapp
    build:
      context: .
      dockerfile: MultiApp/Dockerfile

  multiapi:
    image: ${DOCKER_REGISTRY-}multiapi
    build:
      context: .
      dockerfile: MultiApi/Dockerfile
Also 2 Dockerfile will be created for each of the 2 projects. Check the below image where I have shown these 2 Dockerfile:

Now it is the time to build the Docker Images for these 2 projects.
Before I build the Docker Images, I want to come to Kubernetes Pods topic. Ultimately there will be a Single Pod which will be running the ASP.NET Core app in 2 Docker Containers. The first container will contain the “MultiApp” image while the second container will contain the “MultiApi” image.
The containers will also need to communicate with one another. In my case it is the transfer of a Joke when the Web API is called.
Containers residing in a same Pod are accessible via “localhost”. I will be opening port 8080 for the first container (this container will be running “MultiApp” image), while port 81 will be opened for the second container (this container will be running “MultiApi” image).
Therefore, this means the Web API address will be – https://localhost:81/api/Joke.
So, go to your MultiApp project and change the code which is calling the Web API. Recall this code is inside the Index.cshtml.cs file residing inside the Pages folder. I have shown this change by highlighted line, see below:
public async Task OnGet()
{
    using (var client = new HttpClient())
    {
        var request = new HttpRequestMessage();

        //request.RequestUri = new Uri("http://localhost:53205/api/Joke");
        request.RequestUri = new Uri("http://localhost:81/api/Joke");

        var response = await client.SendAsync(request);
        var joke = await response.Content.ReadAsStringAsync();

        var details = JObject.Parse(joke);
        ViewData["Joke"] = details["name"] + ";;" + details["text"] + ";;" + details["category"];
    }
}
Close Visual Studio now since we will proceed with command prompt from here on.
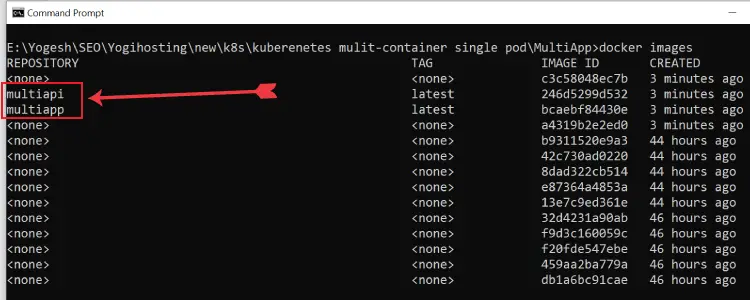
Build Docker Images for the app
Let us build the Docker Images for these 2 projects.
Now, in the command prompt, go to the directory containing this docker-compose.yml file and build it. The build command is given below:
docker-compose buildThis will create 2 images:
- 1. multiapp
- 2. multiapi
Run docker images command to confirm these 2 images are build. I have shown them in the below image.
Create a Single Pod and it’s 2 Containers
I now have to create a Kubernetes Pod which will contain 2 Docker Containers. The container 1 will contain the multiapp docker image while the container 2 will contain the multiapi docker image. I have tried to explain this by the below image:

So create a Kubernetes Deployment configuration file and name it like mydep.yaml. Add the following configurations to it:
apiVersion: apps/v1
kind: Deployment
metadata:
  name: multi-container-dep
  labels:
    app: aspnet-core-multi-container-app
spec:
  replicas: 1
  selector:
    matchLabels:
      component: multi-container
  template:
    metadata:
      labels:
        component: multi-container
    spec:
      containers:
        - name: cmultiapp
          image: multiapp
          imagePullPolicy: Never
          ports:
            - containerPort: 8080
        - name: cmultiapi
          image: multiapi
          imagePullPolicy: Never
          ports:
            - containerPort: 8080
          env:
            - name: ASPNETCORE_URLS
              value: http://+:81
Important points to note:
- 1. The name of this deployment is given by the metadata.name field.
- 2. There are 2 containers specified inside the spec.containers field.
containers:
  - name: cmultiapp
    image: multiapp
    imagePullPolicy: Never
    ports:
      - containerPort: 8080
  - name: cmultiapi
    image: multiapi
    imagePullPolicy: Never
    ports:
      - containerPort: 8080
    env:
      - name: ASPNETCORE_URLS
        value: http://+:81
The 2 container names are “cmultiapp” and “cmultiapi”.
Notice the ports.containerPort fields for these 2 containers.
Notice the second container’s port 81 is exposed. The second container contains the web api and as discussed earlier it’s port 81 is exposed. So, my ASP.NET Core app on container 1 can access the ASP.NET Core app on container 2 with http://localhost:81.
Also check the Dockerfile of the MultiApp & MultiApi project to find that MultiApp exposes port no 8080 and 8081 while MultiApi exposes port no 8080.
The web api app on the container 2 must also be told that it needs to allocated port 81 for it’s url. This is done by adding environment variable. See the env field which does this work:
env:
  - name: ASPNETCORE_URLS
    value: http://+:81
Let us apply the deployment. In your command prompt, navigate to the directory containing the deployment file, and run the kubectl apply command.
kubectl apply -f mydep.yaml
Create a k8s Service for the Pod
Now I will create a service which will connect to this Pod. The service can be accessed on the browser. I will show this later on.
Create a service configuration yaml file called “myservice.yaml” with the following code:
apiVersion: v1
kind: Service
metadata:
  name: multi-container-service
spec:
  type: NodePort
  selector:
    component: multi-container
  ports:
    - port: 9999
      targetPort: 8080
I have named this NodePort service as multi-container-service. The selector field targets the deployment we just created.
Also note the ports filed which exposes service on port 9999 and the service targets the port 8080 of the container. Recall on port 8080 the MultiApp project will be executed.
ports:
  - port: 9999
    targetPort: 8080
So now apply the service by running the kubectl apply -f myservice.yaml. The myservice.yaml file is the name of this service file. It can be any name.
kubectl apply -f myservice.yaml
Now open the service on the browser. So, run the following command on your command prompt window, to find the service address and port.
kubectl get services
In the above image, this service is the last one also note it’s port given as “32481”. So it’s url address becomes http://localhost:32481/.
The below image shows the multi-container app opening through the service url.

Get a Shell to the Containers
I will now go inside the containers and run some command inside the shell. The pod running the containers is named as multi-container-dep-5bdd897d64-jg25r. You can simply run the kubectl get pods command to find it’s name.
Next, run the describe pod command which is:
kubectl describe pod multi-container-dep-5bdd897d64-jg25rIt will describe the pod, telling all the containers it is running. See below given image.

I can get a shell to the containers. I do it for the cmultiapp container. The command to run is:
kubectl exec -it multi-container-dep-5bdd897d64-jg25r -c cmultiapp -- /bin/bash
Type exit and press enter.
Now we will install curl to the “MultiApp” container, for this we will need root shell to the container. We can get it through docker exec command. Run the below command:
docker exec -it -u root 590ef62296db65661bee27a04c9048538a3fc8c108f4ad9c45467f11a96061aa bashThis 590ef62296db65661bee27a04c9048538a3fc8c108f4ad9c45467f11a96061aa is the container id in my case, your’s will be different. You can see the list of containers and their ids by running docker ps command.

Now Install curl inside the container, you have to run the following 2 commands one by one.
apt-get update
apt-get install curl
Next, run the curl command for the api located at localhost:81/api/Joke. The command will be:
curl localhost:81/api/JokeThis command will return you the json of the Joke. See the below image where I have marked each step.

If you run the curl for only localhost i.e.
curl localhost:8080Then it will give the page source of the index page of “MultiApp” project.
Download the source codes:
In this ASP.NET Core Kubernetes tutorial you learned to host a multi-container dockerized ASP.NET Core app on a single Pod. You also learned how these 2 containers communicate with one another and share jokes in json. Kindly share and let this tutorial reach more audiences of dot net.
SHARE THIS ARTICLE
Related Tutorials:


ABOUT THE AUTHOR
I hope you enjoyed reading this tutorial. If it helped you then consider buying a cup of coffee for me. This will help me in writing more such good tutorials for the readers. Thank you.

HELLO EVERYONE
 Welcome to YogiHosting - A Programming Tutorial Website. It is used by millions of people around the world to learn and explore about ASP.NET Core, Blazor, jQuery, JavaScript, Docker, Kubernetes and other topics.
SUBSCRIBE TO NEWSLETTER
Enter your email address to subscribe to this blog and receive notifications of new posts by email.
Join 90K other subscribers