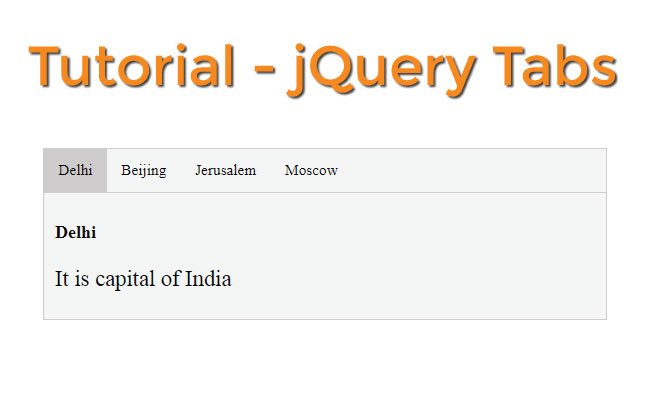
How to use jQuery Tabs feature in less than 1 minute

Tabs are a great way of displaying lots of content in a small area. Only one tab is visible at a time and others are hidden. Clicking on a tab will display it and hide all the others.
In this tutorial you will learn to create jQuery Tabs feature in less than 1 minute time. You can also download the full source code and use it freely in your website.
Tabs HTML Structure
Our jQuery Tabs feature is divided into 2 parts – head & content. It resides in a div with id tabs.
<div id="tabs">
    <!--Head-->
    <!--Content-->
</div>
The CSS for this tabs div:
#tabs {
    overflow: hidden;
    border: 1px solid #ccc;
    background-color: #f1f1f1;
}
Head Part of the Tabs
I use ul and li tags to create the head part of the jQuery Tabs.
<div class="head">
    <ul>
        <li class="active">Delhi</li>
        <li>Beijing</li>
        <li>Jerusalem</li>
        <li>Moscow</li>
    </ul>
</div>
Each li contains a name of the country. The first one has class called active – this is use to make it look selected when the page loads.
The CSS of head part is:
/*Head area*/
#tabs .head {
    display: inline-block;
    width: 100%;
    border-bottom: 1px solid #ccc;
}

    #tabs .head ul {
        list-style: none;
        padding: 0;
        margin: 0;
    }

    #tabs .head li {
        float: left;
        border: none;
        cursor: pointer;
        padding: 14px 16px;
        transition: 0.3s;
        font-size: 17px;
        color: #000;
    }

#tabs li:hover {
    background-color: #ddd;
}

/*Head area active tab*/
#tabs li.active {
    background-color: #ccc;
}
You can see that the active class when applied to the li tag will change it’s background to a greyish color one.
This color gives the appearance of selection to the li tag.
Content Part of the Tabs
The content is the part where the tabs content is shown. It has 4 divs that contains four different countries information.
<div class="content">
    <div class="active">
        <h3>Delhi</h3>
        <p>It is capital of India</p>
    </div>
    <div>
        <h3>Beijing</h3>
        <p>It is capital of China</p>
    </div>
    <div>
        <h3>Jerusalem</h3>
        <p>It is capital of Israel</p>
    </div>
    <div>
        <h3>Moscow</h3>
        <p>It is capital of Russia</p>
    </div>
</div>
Initially when the page loads, the 4 divs remains hidden (display: none), except the first div that has an active class applied to it.
The CSS of the Content part clearly explains this:
/*Content area*/
#tabs .content > div {
    display: none;
    padding: 6px 12px;
    color: #000;
}

    /*Content area active tab*/
    #tabs .content > div.active {
        display: block;
    }
jQuery code of the Tabs
Now let us create the jQuery code for the tabs feature. I apply a click event on the li tags of the head part.
- On the click event I am adding the active class on the clickedli and removing the active class on from the other li tags.
- Other thing which I am doing is adding the active class on the corresponding content div and removing the active class form other content divs.
- I am storing the index of the clicked header li so that I can know which number of the li the user has clicked.
- Next I am using the jQuery nth-child method to find the corresponding index of the content div to which I have to add the active class.
- Once active class is added to the content div then it will be displayed.
The jQuery code for this whole thing is given below.
$("#tabs > .head > ul > li").click(function (e) {
    $(this).addClass("active");
    $(this).siblings().removeClass("active");
    index = $(this).index();

    $("#tabs > .content > div").removeClass("active");
    $("#tabs > .content > div:nth-child(" + (index + 1) + ")").addClass("active");
});
The whole code of jQuery Tabs
HTML Code:
<div id="tabs">
    <div class="head">
        <ul>
            <li class="active">Delhi</li>
            <li>Beijing</li>
            <li>Jerusalem</li>
            <li>Moscow</li>
        </ul>
    </div>
    <div class="content">
        <div class="active">
            <h3>Delhi</h3>
            <p>It is capital of India</p>
        </div>
        <div>
            <h3>Beijing</h3>
            <p>It is capital of China</p>
        </div>
        <div>
            <h3>Jerusalem</h3>
            <p>It is capital of Israel</p>
        </div>
        <div>
            <h3>Moscow</h3>
            <p>It is capital of Russia</p>
        </div>
    </div>
</div>
CSS Code:
/*Tabs*/
#tabs {
    overflow: hidden;
    border: 1px solid #ccc;
    background-color: #f1f1f1;
}

    /*Head area*/
    #tabs .head {
        display: inline-block;
        width: 100%;
        border-bottom: 1px solid #ccc;
    }

        #tabs .head ul {
            list-style: none;
            padding: 0;
            margin: 0;
        }

        #tabs .head li {
            float: left;
            border: none;
            cursor: pointer;
            padding: 14px 16px;
            transition: 0.3s;
            font-size: 17px;
            color: #000;
        }

    #tabs li:hover {
        background-color: #ddd;
    }

    /*Head area active tab*/
    #tabs li.active {
        background-color: #ccc;
    }

    /*Content area*/
    #tabs .content > div {
        display: none;
        padding: 6px 12px;
        color: #000;
    }

        /*Content area active tab*/
        #tabs .content > div.active {
            display: block;
        }
/*End*/
jQuery Code:
<script src="https://ajax.googleapis.com/ajax/libs/jquery/3.1.0/jquery.min.js"></script>
<script>
    $(document).ready(function () {
        $("#tabs > .head > ul > li").click(function (e) {
            $(this).addClass("active");
            $(this).siblings().removeClass("active");
            index = $(this).index();

            $("#tabs > .content > div").removeClass("active");
            $("#tabs > .content > div:nth-child(" + (index + 1) + ")").addClass("active");
        });
    });
</script>
Link for Source Codes:


 Welcome to YogiHosting - A Programming Tutorial Website. It is used by millions of people around the world to learn and explore about ASP.NET Core, Blazor, jQuery, JavaScript, Docker, Kubernetes and other topics.