How to Create jQuery Pagination System in your Web Page

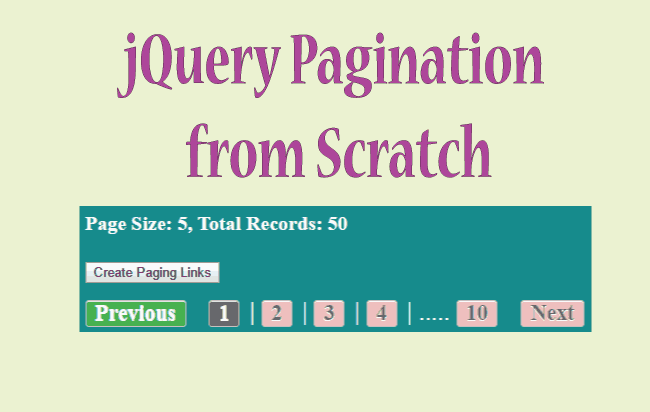
You can show Paging Links in your web page without third party plugins. Instead you create the paging links by yourself with jQuery. Here I will teach you to create this jQuery Pagination system right from the scratch.
The jQuery Pagination Links will be shown inside a div control. Here I will create these paging links on a button click event.
The Page Code:
<button id="pagingButton">Create jQuery Pagination</button>
<div id="pagingDiv"></div>
In your page give the reference to jQuery before the ending body tag.
<script src="https://ajax.googleapis.com/ajax/libs/jquery/3.1.0/jquery.min.js"></script>
Next add the Code:
<script>
    $(document).ready(function () {

        $("#pagingButton").click(function (e) {
            var result = Paging(1, 5, 50, "myClass", "myDisableClass");
            $("#pagingDiv").html(result)
        });

        $("#pagingDiv").on("click", "a", function () {
            var result = Paging($(this).attr("pn"), 5, 50, "myClass", "myDisableClass");
            $("#pagingDiv").html(result)
        });

        function Paging(PageNumber, PageSize, TotalRecords, ClassName, DisableClassName) {
            var ReturnValue = "";

            var TotalPages = Math.ceil(TotalRecords / PageSize);
            if (+PageNumber > 1) {
                if (+PageNumber == 2)
                    ReturnValue = ReturnValue + "<a pn='" + (+PageNumber - 1) + "' class='" + ClassName + "'>Previous</a>   ";
                else {
                    ReturnValue = ReturnValue + "<a pn='";
                    ReturnValue = ReturnValue + (+PageNumber - 1) + "' class='" + ClassName + "'>Previous</a>   ";
                }
            }
            else
                ReturnValue = ReturnValue + "<span class='" + DisableClassName + "'>Previous</span>   ";
            if ((+PageNumber - 3) > 1)
                ReturnValue = ReturnValue + "<a pn='1' class='" + ClassName + "'>1</a> ..... | ";
            for (var i = +PageNumber - 3; i <= +PageNumber; i++)
                if (i >= 1) {
                    if (+PageNumber != i) {
                        ReturnValue = ReturnValue + "<a pn='";
                        ReturnValue = ReturnValue + i + "' class='" + ClassName + "'>" + i + "</a> | ";
                    }
                    else {
                        ReturnValue = ReturnValue + "<span style='font-weight:bold;'>" + i + "</span> | ";
                    }
                }
            for (var i = +PageNumber + 1; i <= +PageNumber + 3; i++)
                if (i <= TotalPages) {
                    if (+PageNumber != i) {
                        ReturnValue = ReturnValue + "<a pn='";
                        ReturnValue = ReturnValue + i + "' class='" + ClassName + "'>" + i + "</a> | ";
                    }
                    else {
                        ReturnValue = ReturnValue + "<span style='font-weight:bold;'>" + i + "</span> | ";
                    }
                }
            if ((+PageNumber + 3) < TotalPages) {
                ReturnValue = ReturnValue + "..... <a pn='";
                ReturnValue = ReturnValue + TotalPages + "' class='" + ClassName + "'>" + TotalPages + "</a>";
            }
            if (+PageNumber < TotalPages) {
                ReturnValue = ReturnValue + "   <a pn='";
                ReturnValue = ReturnValue + (+PageNumber + 1) + "' class='" + ClassName + "'>Next</a>";
            }
            else
                ReturnValue = ReturnValue + "   <span class='" + DisableClassName + "'>Next</span>";

            return (ReturnValue);
        }

    });
</script>
Explanation: On the pagingButton click event, I am calling my jQuery Paging function. This function is the brain here, that creates the paging links in span and anchor tags. It then returns them back, which are shown on the pagingDiv control.
I am passing 1, 5 and 50 for it’s first 3 parameters – 1 for current page, 5 for page size and 50 for total records.
The Paging() function takes the following parameters:
- 1. PageNumber – The Current page number.
- 2. PageSize – The size of the page. Here I set it to 5.
- 3. TotalRecords – The total number of Records on all the pages. Here I set it to 50.
- 4. ClassName – The CSS Class name set on the non-disabled links. In my code I passed myClass to this parameter.
- 5. DisableClassName – The CSS Class name set on the disabled links. I passed myDisableClass to this parameter.
This function creates custom attribute called pn that keeps the value of the page number and this custom parameter is added to the link anchors.
You will also notice I have added click events to the Links Anchors:
$("#pagingDiv").on("click", "a", function () {
//...
});
In these click events, I am calling Paging() function to create the paging links, based on which the page link is clicked.
The current link value is fetched from the custom attribute called pn. The code $(this).attr(“pn”); will fetch me the value of pn present on the clicked anchor.
Add the below CSS to give a proper design to the jQuery Pagination System.
<style>
    #pagingDiv {
        padding-top: 15px;
    }

        #pagingDiv .myDisableClass {
            background-color: #4CAF50;
        }

        #pagingDiv .myClass {
            background-color: #ebbebe;
        }

        #pagingDiv a, #pagingDiv span {
            display: inline-block;
            padding: 0px 9px;
            margin-right: 4px;
            border-radius: 3px;
            border: solid 1px #c0c0c0;
            background: #e9e9e9;
            box-shadow: inset 0px 1px 0px rgba(255,255,255, .8), 0px 1px 3px rgba(0,0,0, .1);
            font-size: .875em;
            font-weight: bold;
            text-decoration: none;
            color: #717171;
            text-shadow: 0px 1px 0px rgba(255,255,255, 1);
        }

            #pagingDiv a:hover {
                cursor: pointer;
                background: #fefefe;
                background: -webkit-gradient(linear, 0% 0%, 0% 100%, from(#FEFEFE), to(#f0f0f0));
                background: -moz-linear-gradient(0% 0% 270deg,#FEFEFE, #f0f0f0);
            }

            #pagingDiv a.active {
                border: none;
                background: #616161;
                box-shadow: inset 0px 0px 8px rgba(0,0,0, .5), 0px 1px 0px rgba(255,255,255, .8);
                color: #f0f0f0;
                text-shadow: 0px 0px 3px rgba(0,0,0, .5);
            }

        #pagingDiv span {
            color: #f0f0f0;
            background: #616161;
        }
</style>
This completes the code, you can now download the full source codes by using the below link:


 Welcome to YogiHosting - A Programming Tutorial Website. It is used by millions of people around the world to learn and explore about ASP.NET Core, Blazor, jQuery, JavaScript, Docker, Kubernetes and other topics.