How to create jQuery Treeview with minimum codes

The jQuery Treeview can be created easily with just a few lines of code. In this tutorial I will create a treeview in HTML’s ul and li tags.
Treeview HTML Code
In this treeview I will show the relationship between Continents, Countries, States & Cities.
This treeview will look like:
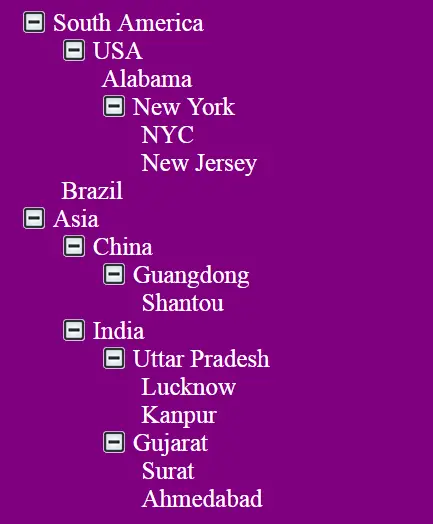
The 2 topmost nodes of the treeview will be the continents – here – North America & Asia.
<ul id="treeview">
    <li>North America</li>
    <li>Asia</li>
</ul>
Then inside North America node there will be USA and Brazil.
Similarly inside Asia node there will be China and India.
<ul id="treeview">
    <li class="parent">North America
        <ul>
            <li>
                USA
            </li>
            <li>Brazil</li>
        </ul>
    </li>
    <li class="parent">Asia
        <ul>
            <li>
                USA
            </li>
            <li>Brazil</li>
        </ul>
    </li>
</ul>
You can see that I am adding the country nodes inside the continent’s li tags, and at the same time adding class=”parent” to the li tag.
This signifies that it is a parent node and so contains some children.
In the same way add states and cities to the country li tags.
That will make the full treeview structure to look like:
<ul id="treeview">
    <li class="parent">
        North America
        <ul>
            <li class="parent">
                USA
                <ul>
                    <li>Alabama</li>
                    <li class="parent">
                        New York
                        <ul>
                            <li>NYC</li>
                            <li>New Jersey</li>
                        </ul>
                    </li>
                </ul>
            </li>
            <li>Brazil</li>
        </ul>
    </li>
    <li class="parent">
        Asia
        <ul>
            <li class="parent">
                China
                <ul>
                    <li class="parent">
                        Guangdong
                        <ul>
                            <li>Shantou</li>
                        </ul>
                    </li>
                </ul>
            </li>
            <li class="parent">
                India
                <ul>
                    <li class="parent">
                        Uttar Pradesh
                        <ul>
                            <li>Lucknow</li>
                            <li>Kanpur</li>
                        </ul>
                    </li>
                    <li class="parent">
                        Gujarat
                        <ul>
                            <li>Surat</li>
                            <li>Ahmedabad</li>
                        </ul>
                    </li>
                </ul>
            </li>
        </ul>
    </li>
</ul>
Treeview CSS
#treeview, #treeview ul {
    list-style: none;
}

    #treeview .parent {
        position: relative;
        cursor: pointer;
    }

        #treeview .parent:before {
            padding-left: 25px;
            background: url(Image/plus-minus.png) no-repeat;
            background-position: -25px top;
            content: "";
            height: 25px;
        }

    #treeview .close:before {
        background-position: 0 top;
    }

    #treeview .parent > ul {
        display: none;
    }
The CSS will give the styling to the treeview. It will initially hide the child nodes – country, state & city.
It also shows the + sign (which is a picture), before the elements, that have the parent class.
There will also be a – sign that shows whenever a parent node is collapsed.
The close class will be applied through the jQuery code on the click event of the parent node. This class changes the sign on the front of the parent node using the background-position CSS property.
Treeview jQuery Code
I promised to keep my jQuery Treeview code shortest and so there they are – just 6 lines only.
$("#treeview .parent").click(function (e) {
    e.stopPropagation();
    $(this).find(">ul").toggle("slow");
    if ($(this).hasClass("close"))
        $(this).removeClass("close");
    else
        $(this).addClass("close");
});
I added a jQuery click event on the parent nodes. This toggles it’s children, and at the same time change the sign by jQuery’s addClass and removeClass methods.
The download link:
This completes the jQuery Treeview tutorial. You can modify the Html of the treview as your wish, the other codes remains the same.
I hope you liked this tutorial so do share it on facebook and twitter.
SHARE THIS ARTICLE
Related Tutorials:


ABOUT THE AUTHOR
I hope you enjoyed reading this tutorial. If it helped you then consider buying a cup of coffee for me. This will help me in writing more such good tutorials for the readers. Thank you.

HELLO EVERYONE
 Welcome to YogiHosting - A Programming Tutorial Website. It is used by millions of people around the world to learn and explore about ASP.NET Core, Blazor, jQuery, JavaScript, Docker, Kubernetes and other topics.
SUBSCRIBE TO NEWSLETTER
Enter your email address to subscribe to this blog and receive notifications of new posts by email.
Join 90K other subscribers