How to Create, Read, Update & Delete users in ASP.NET Core Identity

Page Contents
In this tutorial we will perform ASP.NET Core Identity CRUD Operations for Creating, Reading, Updating and Deleting Users. This will help us to Manage Identity Users right through our ASP.NET Core app. Before continuing, kindly Setup and Configure ASP.NET Core Identity in your app. Once you did it kindly follow from here.
This tutorial is a part of the ASP.NET Core Identity series
- 1. How to Setup and Configure ASP.NET Core Identity
- 2. How to Create, Read, Update & Delete users in ASP.NET Core Identity
- 3. Username, Email & Password Policy in ASP.NET Core Identity
- 4. How to do Authentication of Users in ASP.NET Core Identity
- 5. How to work with Roles in ASP.NET Core Identity
- 6. How to add Custom User Properties in ASP.NET Core Identity
- 7. How to work with Claims in ASP.NET Core Identity
- 8. How to work with Policies in ASP.NET Core Identity
- 9. How to integrate Google login feature in ASP.NET Core Identity
- 10. Two-Factor Authentication in ASP.NET Core Identity
- 11. How to perform Email Confirmation of Users in ASP.NET Core Identity
- 12. Creating Password Reset feature in ASP.NET Core Identity
- 13. User Lockout in ASP.NET Core Identity
ASP.NET Core Identity UserManager class
ASP.NET Core Identity UserManager class of Microsoft.AspNetCore.Identity namespace helps to manage Identity users stored in the database. The generic version of this class is UserManager<T> where T is the class chosen to represent users. We will be using this class to perform CRUD operations for the users.
The below table describes the most useful UserManager<T> class members.
| Name | Description |
|---|---|
| Users | This property returns a sequence containing the users stored in the Identity database. |
| FindByIdAsync(id) | This method queries the database for the user object with the specified ID. |
| CreateAsync(user, password) | This method register a user in Identity with the specified password. |
| UpdateAsync(user) | This method modifies an existing user in the Identity database. |
| DeleteAsync(user) | This method removes the specified user from the Identity database. |
| AddToRoleAsync(user, name) | Adds a user to a role |
| RemoveFromRoleAsync(user, name) | Removes a user from a role |
| GetRolesAsync(user) | Gives the names of the roles in which the user is a member |
| IsInRoleAsync(user, name) | Returns true is the user is a member of a specified role, else returns false |
In the previous tutorial, when we created the Entity Framework Core Database Context class, we specified AppUser as the class to represent users in the database.
The below table describes the most useful AppUser class properties.
| Name | Description |
|---|---|
| Id | It contains the Unique Id of the user. |
| UserName | It contains the user’s username. |
| It contains the email for the user. |
Create Users in Identity
To create new Users in ASP.NET Core Identity we will need a C# Class. So create a new class called User.cs inside the Models folders. Next, add 3 public properties to it, which are Name, Email & Password, each of type string. Also add [Required] validation attributes to all of them.
We also add RegularExpression valiation attribute over the Email property to valdiate proper email entries.
using System.ComponentModel.DataAnnotations;

namespace Identity.Models
{
    public class User
    {
        [Required]
        public string Name { get; set; }

        [Required]
        [RegularExpression("^[a-zA-Z0-9_\\.-]+@([a-zA-Z0-9-]+\\.)+[a-zA-Z]{2,6}$", ErrorMessage = "E-mail is not valid")]
        public string Email { get; set; }

        [Required]
        public string Password { get; set; }
    }
}
Next, create a new Controller called AdminController.cs. Inside the Admin Controller we perform all the CRUD Operations.
The code for the Admin Controller is given below:
using Identity.Models;
using Microsoft.AspNetCore.Identity;
using Microsoft.AspNetCore.Mvc;

namespace Identity.Controllers
{
    public class AdminController : Controller
    {
        private UserManager<AppUser> userManager;

        public AdminController(UserManager<AppUser> usrMgr)
        {
            userManager = usrMgr;
        }

        public IActionResult Index()
        {
            return View();
        }
    }
}
In the Controller we get the instance of UserManager class through Dependency Injection technique. Then we set the value of the variable called userManager to the UserManager object which we get through Dependency Injection.
Next, we need to add a Create Action method that will create a new user in the Identity database. So add this action to your Admin controller as shown below.
public ViewResult Create() => View();

[HttpPost]
public async Task<IActionResult> Create(User user)
{
    if (ModelState.IsValid)
    {
        AppUser appUser = new AppUser
        {
            UserName = user.Name,
            Email = user.Email
        };

        IdentityResult result = await userManager.CreateAsync(appUser, user.Password);

        if (result.Succeeded)
            return RedirectToAction("Index");
        else
        {
            foreach (IdentityError error in result.Errors)
                ModelState.AddModelError("", error.Description);
        }
    }
    return View(user);
}
The post version of the Create acton does the creation of a new Identity User. It takes an argument of the User class and checks if the Model State is valid or not.
If the Model State is valid then it creates a new instance of AppUser class, and gives it the Username and Email values as provided in the User class object. The respective code for this is:
AppUser appUser = new AppUser
{
    UserName = user.Name,
    Email = user.Email
};
After this, we create the user from the CreateAsync method of the UserManager class. As you remember we get this class object through Dependency Injection. The CreateAsync method takes 2 parameters which are – AppUser class object and the password. Once the User is created, it returns IdentityResult class type which represents the result of the operation. The code that does this work is:
IdentityResult result = await userManager.CreateAsync(appUser, user.Password);The IdentityResult Class has the following properties:
- Succeeded – this property returns true if the create user operation completes successfully.
- Errors – this property returns an object of type IEnumerable that contains all the errors occurred while performing the Identity operation. The IdentityError has a description property which gives the description of each of the error that happened.
We used the Succeeded property of the IdentityResult class to find out whether the create user operation completed successfully or not.
If it completed successfully then we are redirecting to the Index View else we are adding all the error descriptions to the Model State. The code lines that does this are:
if (result.Succeeded)
    return RedirectToAction("Index");
else
{
    foreach (IdentityError error in result.Errors)
        ModelState.AddModelError("", error.Description);
}
On the last line we are returning the user to the Create View – return View(user). Here the errors will be shown on the browser so that they can be corrected.
Now it’s time to add the Create.cshtml Razor View file inside the Views ➤ Admin folder with the following code:
@model User
@{
    ViewData["Title"] = "CREATE USER";
}

<h1 class="bg-info text-white">Create User</h1>
<a asp-action="Index" class="btn btn-secondary">Back</a>
<div asp-validation-summary="All" class="text-danger"></div>

<form method="post">
    <div class="form-group">
        <label asp-for="Name"></label>
        <input asp-for="Name" class="form-control" />
    </div>
    <div class="form-group">
        <label asp-for="Email"></label>
        <input asp-for="Email" class="form-control" />
    </div>
    <div class="form-group">
        <label asp-for="Password"></label>
        <input asp-for="Password" class="form-control" />
    </div>
    <button type="submit" class="btn btn-primary">Create</button>
</form>
The View has a simple form to Create a new Identity User by entering his Name, Email and Password. These values are received in the Admin Controller’s Create Action method and then the user’s account is created in the Identity Database.
return RedirectToAction("Index"), redirects to the Index view on successful user creation. Therefore kindly add Index.cshtml razor view inside the Views ➤ Admin folder else Dot Net will give 404 error. Just keep this view empty for the time being.Let’s run the app and create a new user. Go to the URL – https://localhost:7263/Admin/Create which will present a form and enter Name, Email and Password as shown below, and click the Create button.
- Name : Yogi
- Email : [email protected]
- Password : Admin@123
Note that Identity requires password’s length should be at least 6 characters and it must contain at least one non alphanumeric, one lowercase and one uppercase characters.

Once the User is created we will be redirected to the Index View. The Index View will show every User accounts stored in the Identity database. We will create this feature next.
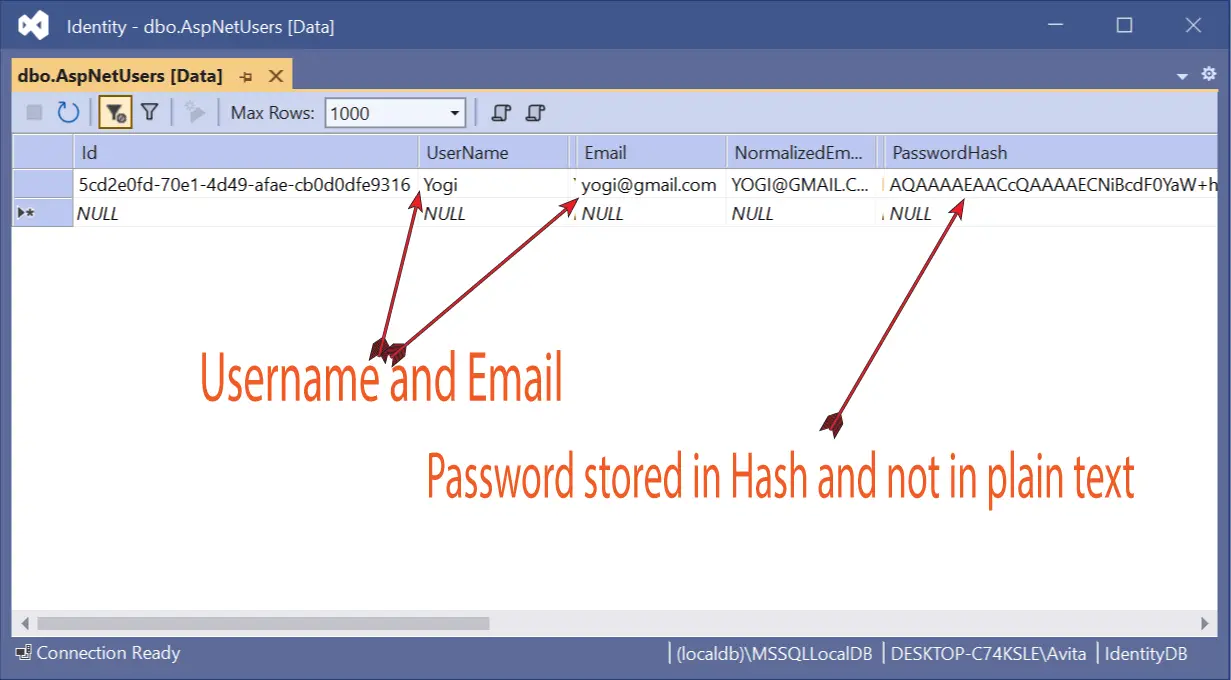
All Identity Users are created in the AspNetUsers table of the Identity Database. Open this table to find the user record is created. Note that for security purpose, ASP.NET Core Identity stores the password of the user in encrypted Hash and not in plain text. Check the below image where we have shown the user entry in this table.
Read all Users in Identity
We can get all Identity Users from the Identity database by the Users property of the UserManager class. The Users property will return an IEnumerable object.
Change the Index Action method’s code of the AdminController.cs to as shown in the below code:
using Microsoft.AspNetCore.Mvc;
using Identity.Models;
using Microsoft.AspNetCore.Identity;

namespace Identity.Controllers
{
    public class AdminController : Controller
    {
        private UserManager<AppUser> userManager;

        public AdminController(UserManager<AppUser> usrMgr)
        {
            userManager = usrMgr;
        }

        public IActionResult Index()
        {
            return View(userManager.Users);
        }

        // removed for brevity
    }
}
We return all these users as IEnumerable to the view.
Now, on the Index.cshtml razor view file located inside the Views ➤ Admin folder, we will show the details of all the Identity Users. So change it’s code as shown below.
@model IEnumerable<AppUser>
@{
    ViewData["Title"] = "READ USER";
}

<h1 class="bg-info text-white">All Users</h1>
<a asp-action="Create" class="btn btn-secondary">Create a User</a>

<table class="table table-sm table-bordered">
    <tr>
        <th>ID</th>
        <th>Name</th>
        <th>Email</th>
    </tr>
    @foreach (AppUser user in Model)
    {
    <tr>
        <td>@user.Id</td>
        <td>@user.UserName</td>
        <td>@user.Email</td>
    </tr>
    }
</table>
The View receives a Model of type IEnumerable<AppUser>. We are looping over all the users using for each loop and showing their details inside a table.
You can now test this functionality by going to the URL – https://localhost:7263/Admin, which will invoke the Index Action method.
The Image below shows all the User records that are currently there in the Identity Database. It will show just 1 record which is the Identity User account we created earlier.

Update Users in Identity
Now we will Update Identity User records in ASP.NET Core. Here we need to update the Index View and add a new column called Update to the HTML table. In this column we will add an anchor tag that will link to the Update Action method.
The updated code of the Index.cshtml View is highlighted and shown below:
@model IEnumerable<AppUser>
@{
    ViewData["Title"] = "READ USER";
}

<h1 class="bg-info text-white">All Users</h1>
<a asp-action="Create" class="btn btn-secondary">Create a User</a>

<table class="table table-sm table-bordered">
	<tr>
		<th>ID</th>
		<th>Name</th>
		<th>Email</th>
		<th>Update</th>
	</tr>
	@foreach (AppUser user in Model)
	{
		<tr>
			<td>@user.Id</td>
			<td>@user.UserName</td>
			<td>@user.Email</td>
			<td>
				<a class="btn btn-sm btn-primary" asp-action="Update" asp-route-id="@user.Id">
					Update
				</a>
			</td>
		</tr>
	}
</table>
Coming to the Admin controller, here we need to add a dependency of IPasswordHasher in the constructor. It is used to get the hashed value of the user password. This is because for security purpose ASP.NET Core Identity stores the User password in Hashed value instead of plain text. Therefore even if a hacker gains access to the database and finds this hashed value, he cannot login to a user acccount.
So, update the AdminController.cs as shown below:
using Microsoft.AspNetCore.Mvc;
using Identity.Models;
using Microsoft.AspNetCore.Identity;

namespace Identity.Controllers
{
    public class AdminController : Controller
    {
        private UserManager<AppUser> userManager;
        private IPasswordHasher<AppUser> passwordHasher;

        public AdminController(UserManager<AppUser> usrMgr, IPasswordHasher<AppUser> passwordHash)
        {
            userManager = usrMgr;
            passwordHasher = passwordHash;
        }

        // removed for brevity
    }
}
Next, add the Update action to the Admin controller. The code is highlighted and given below:
using Microsoft.AspNetCore.Mvc;
using Identity.Models;
using Microsoft.AspNetCore.Identity;

namespace Identity.Controllers
{
    public class AdminController : Controller
    {
        private UserManager<AppUser> userManager;
        private IPasswordHasher<AppUser> passwordHasher;

        public AdminController(UserManager<AppUser> usrMgr, IPasswordHasher<AppUser> passwordHash)
        {
            userManager = usrMgr;
            passwordHasher = passwordHash;
        }

        // removed for brevity

        public async Task<IActionResult> Update(string id)
        {
            AppUser user = await userManager.FindByIdAsync(id);
            if (user != null)
                return View(user);
            else
                return RedirectToAction("Index");
        }

        [HttpPost]
        public async Task<IActionResult> Update(string id, string email, string password)
        {
            AppUser user = await userManager.FindByIdAsync(id);
            if (user != null)
            {
                if (!string.IsNullOrEmpty(email))
                    user.Email = email;
                else
                    ModelState.AddModelError("", "Email cannot be empty");

                if (!string.IsNullOrEmpty(password))
                    user.PasswordHash = passwordHasher.HashPassword(user, password);
                else
                    ModelState.AddModelError("", "Password cannot be empty");

                if (!string.IsNullOrEmpty(email) && !string.IsNullOrEmpty(password))
                {
                    IdentityResult result = await userManager.UpdateAsync(user);
                    if (result.Succeeded)
                        return RedirectToAction("Index");
                    else
                        Errors(result);
                }
            }
            else
                ModelState.AddModelError("", "User Not Found");
            return View(user);
        }

        private void Errors(IdentityResult result)
        {
            foreach (IdentityError error in result.Errors)
                ModelState.AddModelError("", error.Description);
        }
    }
}
The HTTP GET version of the Update Action takes a string value called id. It will contains the Id value of the user registered in the Identity database. The User’s record is fetched from the Identity database using the FindByIdAsync() method of the UserManager class. The FindByIdAsync() method is provided with the Id of the Identity User as shown below.
AppUser user = await userManager.FindByIdAsync(id);Once the User’s information is fetched, it is then send to the Update View as model.
The HTTP POST version of the Update Action is where we update the identity user’s record. This action is invoked when the user clicks the submit button on the update form given on the Update View.
First we fetch the User’s information in an AppUser object by using the FindByIdAsync() method:
AppUser user = await userManager.FindByIdAsync(id);If the AppUser object is not null, we proceed by checking if the new email and password values are not empty. If they contain proper values then we update the Email and PasswordHash property values of the AppUser object to the new ones that are provided in the update form.
See the below code which does this work:
if (!string.IsNullOrEmpty(email))
    user.Email = email;
else
    ModelState.AddModelError("", "Email cannot be empty");

if (!string.IsNullOrEmpty(password))
    user.PasswordHash = passwordHasher.HashPassword(user, password);
else
    ModelState.AddModelError("", "Password cannot be empty");
Note that to update password in Identity we used the HashPassword() method to generate password hash of the password string that the user entered. This is done because Identity stores password in it’s hashed representation and not in the plain text.
user.PasswordHash = passwordHasher.HashPassword(user, password);Finally, we update them using the UpdateAsync method. This method takes the AppUser object. The associated code is given below:
if (!string.IsNullOrEmpty(email) && !string.IsNullOrEmpty(password))
{
    IdentityResult result = await userManager.UpdateAsync(user);
    if (result.Succeeded)
        return RedirectToAction("Index");
    else
        Errors(result);
}
In case, if the UpdateAsync() method does not completes successfully, then the method called Errors() is called to add the errors contained by IdentityResult object to the Model State. These errors will be shown on the browser. This code is:
void Errors(IdentityResult result)
{
    foreach (IdentityError error in result.Errors)
        ModelState.AddModelError("", error.Description);
}
Now, create the Update.cshtml razor view inside the Views ➤ Admin folder with the following code:
@model AppUser
@{
	ViewData["Title"] = "UPDATE USER";
}

<h1 class="bg-info text-white">Update User</h1>
<a asp-action="Index" class="btn btn-secondary">Back</a>
<div asp-validation-summary="All" class="text-danger"></div>

<form asp-action="Update" method="post">
	<div class="form-group">
		<label asp-for="Id"></label>
		<input asp-for="Id" class="form-control" disabled />
	</div>
	<div class="form-group">
		<label asp-for="Email"></label>
		<input asp-for="Email" class="form-control" />
	</div>
	<div class="form-group">
		<label for="password">Password</label>
		<input name="password" class="form-control" />
	</div>
	<button type="submit" class="btn btn-primary">Save</button>
</form>
Test the update feature by re-visiting the Index action of Admin Controller having the URL – https://localhost:7263/Admin. There click the Update button which will take you to the update page. Add new Email and password and click the save button. This will update the User’s record stored in the Identity database.
The below images illustrates the Update feature:

Delete Users in Identity
The final CRUD operation is the Delete users from Identity database. It will be done by the Delete Action method of the Admin Controller. The code of the Delete Action method is given below.
using Microsoft.AspNetCore.Mvc;
using Identity.Models;
using Microsoft.AspNetCore.Identity;

namespace Identity.Controllers
{
    public class AdminController : Controller
    {
        private UserManager<AppUser> userManager;
        private IPasswordHasher<AppUser> passwordHasher;

        public AdminController(UserManager<AppUser> usrMgr, IPasswordHasher<AppUser> passwordHash)
        {
            userManager = usrMgr;
            passwordHasher = passwordHash;
        }

        // removed for brevity

        [HttpPost]
        public async Task<IActionResult> Delete(string id)
        {
            AppUser user = await userManager.FindByIdAsync(id);
            if (user != null)
            {
                IdentityResult result = await userManager.DeleteAsync(user);
                if (result.Succeeded)
                    return RedirectToAction("Index");
                else
                    Errors(result);
            }
            else
                ModelState.AddModelError("", "User Not Found");
            return View("Index", userManager.Users);
        }
    }
}
This ASP.NET Core Action method receives the User Id and it fetches the user’s Identity record using the FindByIdAsync() method. We get the corresponding User in an AppUser object. Then we use the DeleteAsync method to delete the Identity user from the database. The below code does the delete work:
IdentityResult result = await userManager.DeleteAsync(user);If the delete operation completes successfully then user is redirected to the Index Action method else the Errors() function is called to show the errors to the user.
The delete button needs to be added to the HTML table of the Index View. This is shown in the highlighted code given below.
@model IEnumerable<AppUser>
@{
    ViewData["Title"] = "READ USER";
}

<h1 class="bg-info text-white">All Users</h1>
<a asp-action="Create" class="btn btn-secondary">Create a User</a>

<table class="table table-sm table-bordered">
	<tr>
		<th>ID</th>
		<th>Name</th>
		<th>Email</th>
		<th>Update</th>
		<th>Delete</th>
	</tr>
	@foreach (AppUser user in Model)
	{
		<tr>
			<td>@user.Id</td>
			<td>@user.UserName</td>
			<td>@user.Email</td>
			<td>
				<a class="btn btn-sm btn-primary" asp-action="Update" asp-route-id="@user.Id">
					Update
				</a>
			</td>
			<td>
                <form asp-action="Delete" asp-route-id="@user.Id" method="post">
                    <button type="submit" class="btn btn-sm btn-danger">
                        Delete
                    </button>
                </form>
            </td>
		</tr>
	}
</table>
Run the application and go to the URL- https://localhost:7263/Admin. Here we will see all the Identity User records with a delete button next to them. When we click any of the delete button then the corresponding user record will get deleted from the Identity database.
See the below image:

You can download the full codes of this tutorial from the below link:
This completes the procedure to manage users in Identity. You can now add, update, read and delete users from Identity database.
SHARE THIS ARTICLE
Related Tutorials:


ABOUT THE AUTHOR
I hope you enjoyed reading this tutorial. If it helped you then consider buying a cup of coffee for me. This will help me in writing more such good tutorials for the readers. Thank you.

HELLO EVERYONE
 Welcome to YogiHosting - A Programming Tutorial Website. It is used by millions of people around the world to learn and explore about ASP.NET Core, Blazor, jQuery, JavaScript, Docker, Kubernetes and other topics.
SUBSCRIBE TO NEWSLETTER
Enter your email address to subscribe to this blog and receive notifications of new posts by email
Join 90K other subscribers