How to do Authentication of Users in ASP.NET Core Identity
Page Contents
What is Identity Authentication in ASP.NET Core? Authentication is the process of recognition of a user when he successfully logins to the app. ASP.NET Core Identity presents a login form where user has to provide his username and password to authenticate himself. On successful login, Identity authenticates the user and he is granted access the secured resources of the ASP.NET Core app.
How Authentication works in ASP.NET Core Identity
Let us create the ASP.NET Core Identity Authentication feature where we allow only authenticated Identity Users to access a controller. So first create a new Controller called HomeController.cs and add an action method called Secured which returns a string message – Hello to the view.
using Microsoft.AspNetCore.Mvc;

namespace Identity.Controllers
{
    public class HomeController : Controller
    {
        public IActionResult Secured()
        {
            return View((object)"Hello");
        }
    }
}
Next, add Secured.cshtml razor view inside the Views ➤ Home folder with the following code:
@model string

@{
    ViewData["Title"] = "Authentication";
}

<h1 class="bg-info text-white">Secured</h1>
@Model
The View does nothing special except for showing the string Hello which is returned by the Controller. Now run the project and we will see the Hello message displayed on your browser, see below image:
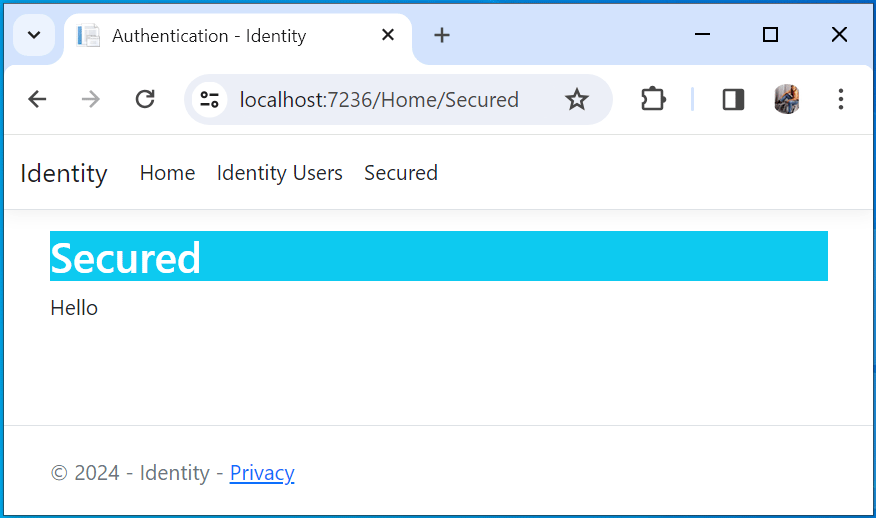
There is no requirement for authentication here so we are able to invoke the Secured Action method without any restriction. When we ran the app, the browser sent an un-authenticated request (anonymous request) to the home controllers’s Secured action method. This un-authenticated request was able to access the app resource, which is the home controller, and so we saw the Hello message on the browser.
Now we will restrict the Secured Action by applying Identity Authentication so that users have to first authenticate themselves before Identity authorizes them to invoke the action method.
Note that Identity Authorization is different than Authentication and comes to the picuture after a user is authenticated. Identity Authorization means that Identity will authorize a user to access a resource on the app only after he is authenticated.
Applying Identity Authentication is very easy, we only need to apply the [Authorize] attribute of the Microsoft.AspNetCore.Authorization namespace on the Secured action method. This will restrict it’s access to authenticated users only.
using Microsoft.AspNetCore.Authorization;
using Microsoft.AspNetCore.Mvc;

namespace Identity.Controllers
{
    public class HomeController : Controller
    {
        [Authorize]
        public IActionResult Secured()
        {
            return View((object)"Hello");
        }
    }
}
Now run the app once again, and this time we will see a message stating – The localhost page can’t be found. HTTP ERROR 404. This is shown by the image below:
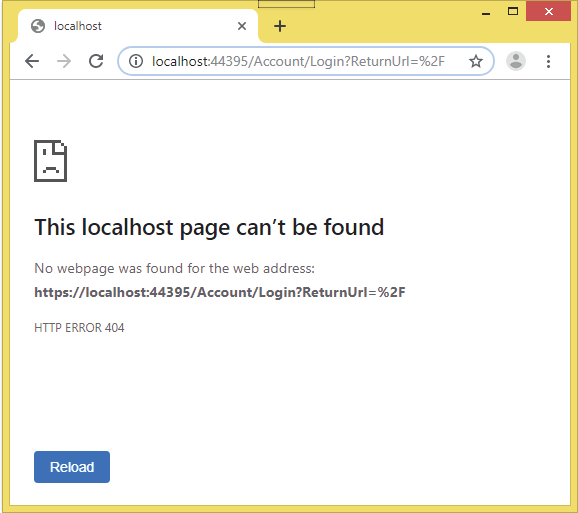
There are 2 things that happened here:
- We applied the [Authorize] attribute to the Secured Action so now users have to authenticate themselves before they wish to access it.
- ASP.NET Core Identity redirected us to the Login action of the Account controller which is the default login url of Identity and it’s URL is – http://localhost:7263/Account/Login?ReturnUrl=%2F. In this page we can log in to the application. We will construct this page in a moment.
Notice the URL contains the query string variable called ReturnUrl which contains %2F. %2F is an encoded URL which stands for /. So after authentication, users will be redirected to the home URL of the app which is http://localhost:7263.
Return url will contain the secured page url which the user tried to access before authentication. Once authenticated, Identity will redirects the user back to this originating page.
Changing the Default Login URL in Identity
ASP.NET Core Identity default Login URL is /Account/Login and here users are redirected to authenticate themselves. Here a login form is presented to the users for performing the login procedure in Identity. If we want to change this login URL then go to the Program class and add the below code to it:
builder.Services.ConfigureApplicationCookie(opts => opts.LoginPath = "/Authenticate/Login");Here we have specified the new login URL as /Authenticate/Login i.e https://localhost:7263/Authenticate/Login. In your case port may differ. Note that this URL cannot be formed based on the routes present on the app, so on changing the routes we should make sure that we also change the Identity Login URL manually here.
ASP.NET Core Identity Authentication
For implementing Identity Authentication we will have to create 2 pages – Login and Logout. In the login page, user has to enter his username and password for authentication while in the logout page user can click the logout button which will logout him from Identity.
ASP.NET Core Identity Login Page
Create a Login.cs class inside the Models folder. This class has 3 properties – Email, Password and ReturnUrl, for containing the user’s login information.
Email and Password properties are made Required fields since user will have to enter both of them while login. The ReturnUrl property will contains the Return URL.
The Login.cs class code is given below:
using System.ComponentModel.DataAnnotations;

namespace Identity.Models
{
    public class Login
    {
        [Required]
        public string Email { get; set; }

        [Required]
        public string Password { get; set; }

        public string ReturnUrl { get; set; }
    }
}
Identity defualt Login URL is https://localhost:7263/Account/Login. Therefore we need to create the Account controller which will be the Login Controller for Identity. We will also add the Login action method which will be initiated when user will perform the login part.
So create the AccountController.cs class in the Controllers folder with the following code:
using Microsoft.AspNetCore.Mvc;
using Microsoft.AspNetCore.Authorization;
using Microsoft.AspNetCore.Identity;
using Identity.Models;

namespace Identity.Controllers
{
    [Authorize]
    public class AccountController : Controller
    {
        private UserManager<AppUser> userManager;
        private SignInManager<AppUser> signInManager;

        public AccountController(UserManager<AppUser> userMgr, SignInManager<AppUser> signinMgr)
        {
            userManager = userMgr;
            signInManager = signinMgr;
        }

        [AllowAnonymous]
        public IActionResult Login(string returnUrl)
        {
            Login login = new Login();
            login.ReturnUrl = returnUrl;
            return View(login);
        }

        [HttpPost]
        [AllowAnonymous]
        [ValidateAntiForgeryToken]
        public async Task<IActionResult> Login(Login login)
        {
            if (ModelState.IsValid)
            {
                AppUser appUser = await userManager.FindByEmailAsync(login.Email);
                if (appUser != null)
                {
                    await signInManager.SignOutAsync();
                    Microsoft.AspNetCore.Identity.SignInResult result = await signInManager.PasswordSignInAsync(appUser, login.Password, false, false);
                    if (result.Succeeded)
                        return Redirect(login.ReturnUrl ?? "/");
                }
                ModelState.AddModelError(nameof(login.Email), "Login Failed: Invalid Email or password");
            }
            return View(login);
        }
    }
}
The controller class is applied with an [Authorize] attribute so that it cannot be invoked by un-authenticated requests. However we have added [AllowAnonymous] attribute to the Login Action Methods so that these action methods are allowed to be invoked by un-authenticated requests.
This is done because an un-authenticated user must be allowed to view login page otherwise he can never login to Identity.
We have added a dependency of UserManager<AppUser> & SignInManager<AppUser> in the constructor of the controller so these objects will be provided by the Dependency Injection feature of ASP.NET Core.
The associated code is given below:
private UserManager<AppUser> userManager;
private SignInManager<AppUser> signInManager;

public AccountController(UserManager<AppUser> userMgr, SignInManager<AppUser> signinMgr)
{
    userManager = userMgr;
    signInManager = signinMgr;
}
The UserManager is used to manage Users in Identity while the SignInManager is used to perform the authentication procedure.
Next, we added the HTTP GET version of the Login action method. We applied the [AllowAnonymous] attribute on it so that it does not require authentication. This is obvious otherwise users will not be able to perform login.
This action has a returnUrl variable in the parameter whose value is provided from the ReturnUrl query sting variable. Behind the scene, Model Binding will automatically bind the return url value to this variable.
The action method code is:
[AllowAnonymous]
public IActionResult Login(string returnUrl)
{
    Login login = new Login();
    login.ReturnUrl = returnUrl;
    return View(login);
}
The action return Login class object as a model to the view. Notice we have set the value of the ReturnUrl property to the value that comes to the action’s parameter.
Next, we have added the POST version of the Login Action method where the actual authentication of the user will be performed. The action method code is:
[HttpPost]
[AllowAnonymous]
[ValidateAntiForgeryToken]
public async Task<IActionResult> Login(Login login)
{
    if (ModelState.IsValid)
    {
        AppUser appUser = await userManager.FindByEmailAsync(login.Email);
        if (appUser != null)
        {
            await signInManager.SignOutAsync();
            Microsoft.AspNetCore.Identity.SignInResult result = await signInManager.PasswordSignInAsync(appUser, login.Password, false, false);
            if (result.Succeeded)
                return Redirect(login.ReturnUrl ?? "/");
        }
        ModelState.AddModelError(nameof(login.Email), "Login Failed: Invalid Email or password");
    }
    return View(login);
}
This action method has a parameter, of type Login.cs, through which it receives the login values (i.e. email & password) filled by the user in the login form given on the Login View. The method is provided with 2 attributes which are:
1. [AllowAnonymous] attribute allows it to be invoked by un-authenticated requests.
2. [ValidateAntiForgeryToken] to prevent cross-site request forgery.
First we get the User’s details from the FindByEmailAsync() method of the UserManager class. This method takes the email address which is provided by the user on the login form. See below code:
AppUser appUser = await userManager.FindByEmailAsync(login.Email);Next, we check if the user details received on the AppUser object are not null. In that case we are first signing out any logged in user from the application:
await signInManager.SignOutAsync();Then we are using the PasswordSignInAsync method of the SignInManager class to log-in the user in the app.
Microsoft.AspNetCore.Identity.SignInResult result = await signInManager.PasswordSignInAsync(appUser, login.Password, false, false);We have provided false values for both last 3rd and 4th parameters because we don’t want a persistence cookie for a persistence login (that remain even after closing the browser), nor we want to lock the user account when sign-in fails.
This method returns SignInResult object that contains the result of the sign-in procedure. It’s Succeeded property contains true value if the sign-in is successful else contains false.
Finally, we check the value of the Succeeded property is true or not. In that case we are returning the user to the return url value. The code which does this work is:
if (result.Succeeded)
    return Redirect(login.ReturnUrl ?? "/");
We also need the Login View which will contain the Login form. This view will form the Identity Login Page where users will perform the login process to their accounts. So create the Login razor view inside the Views/Account folder with the code as shown below:
@model Login
@{
    ViewData["Title"] = "Login";
}

<h1 class="bg-info text-white">Login</h1>
<div class="text-danger" asp-validation-summary="All"></div>

<form asp-action="Login" method="post">
    <input type="hidden" asp-for="ReturnUrl" />
    <div class="form-group">
        <label asp-for="Email"></label>
        <input asp-for="Email" class="form-control" />
    </div>
    <div class="form-group">
        <label asp-for="Password"></label>
        <input asp-for="Password" class="form-control" />
    </div>
    <button class="btn btn-primary" type="submit">Log In</button>
</form>
It’s time to test the Identitiy Authentication feature. We already have a user registered with the following details:
1. Name – tom
2. Email – [email protected]
3. Password – Coder77@
Now we will login in with this user’s credentials.
If you don’t have any user then create a new one from the URL – https://localhost:7263/Admin/Create.
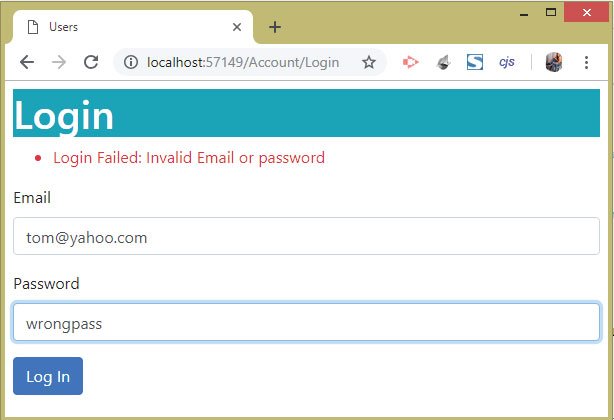
1. Email – [email protected]
2. Password – wrongpass
On clicking the Log In button we will see the message – Login Failed: Invalid Email or password. This is because we entered the wrong password, see the below image:
Now enter the correct password and click the Log In button. We will see the authentication is successful this time and will be redirected to the Home controller’s Index view where we see the Hello message. Check the below image.

We can get the current user in Identity from the GetUserAsync() method of the UserManager class. We can then show this current user name on the view. Check the below code with gets the logged-in user’s name.
AppUser user = await userManager.GetUserAsync(HttpContext.User);Edit the Home Controller’s code to fetch the user and send his name to the view.
using Identity.Models;
using Microsoft.AspNetCore.Authorization;
using Microsoft.AspNetCore.Identity;
using Microsoft.AspNetCore.Mvc;

namespace Identity.Controllers
{
    public class HomeController : Controller
    {
        private UserManager<AppUser> userManager;
        public HomeController(UserManager<AppUser> userMgr)
        {
            userManager = userMgr;
        }

        [Authorize]
        public async Task<IActionResult> Index()
        {
            AppUser user = await userManager.GetUserAsync(HttpContext.User);
            string message = "Hello " + user.UserName;
            return View((object)message);
        }
    }
}
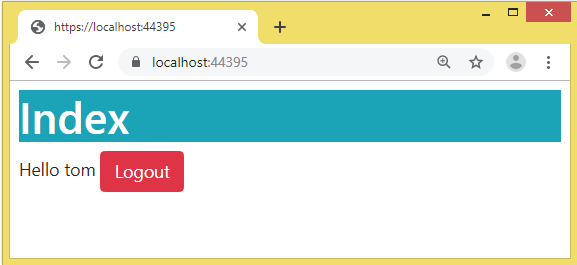
Now the user’s name will be shown on the browser after login, check below image:
ASP.NET Core Identity Logout
The Logout feature will simply logout the signed user from Identity. So add the Logout action method to the AccountController.cs with the following code:
public async Task<IActionResult> Logout()
{
    await signInManager.SignOutAsync();
    return RedirectToAction("Index", "Home");
}
The Logout Action is fairly simple which just uses signInManager.SignOutAsync() to do the sign-out of any logged in user from the application.
The Logout Action method will be linked from the Home Controller’s Index View with an anchor tag. So update this view like shown below:
@model string

@{
    ViewData["Title"] = "Authentication";
}

<h1 class="bg-info text-white">Index</h1>
@Model

@if (User?.Identity?.IsAuthenticated ?? false)
{
    <a asp-controller="Account" asp-action="Logout" class="btn btn-danger">Logout</a>
}
Here, we used the RazorPageBase class of the Microsoft.AspNetCore.Mvc.Razor namespace. This class’s User.Identity.IsAuthenticated property gives true if the user is logged in else returns null. We have used it to show Logout link only when the user is logged in to the application.
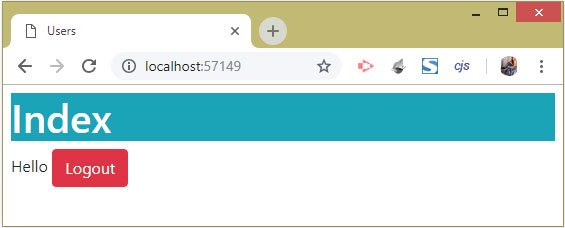
Run the app and log-in with a user’s account. After login we will be redirected to the home page where we can see the Logout button. Click it to log out from ASP.NET Core Identity. See the below image:
ASP.NET Core Identity Cookie
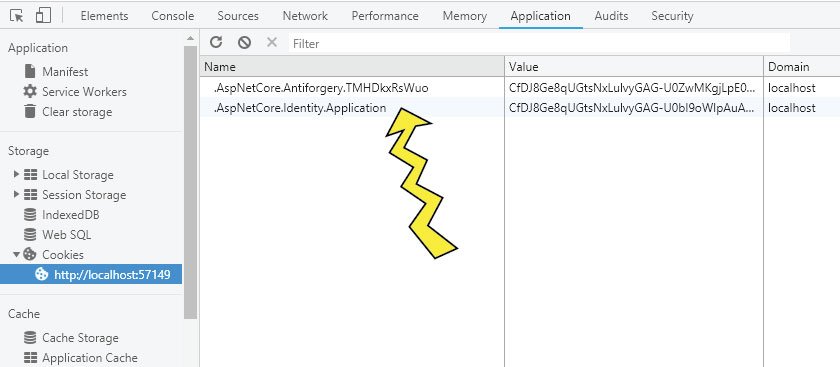
The ASP.NET Core Identity uses a cookie to determine whether a user is currently authenticated or not. This cookie is created once a user is authenticated and stored in the browser. The same cookie is sent to the server at each & every HTTP Request, like when we open any URL of the application in the browser. This enables Identity to determine from which user a request is coming from.
This cookie name is .AspNetCore.Identity.Application. We can check this cookie in the Application tab of chrome browser’s developer tools. See the below image:
Identity Cookie Timeout
We can set the expiry time of the ASP.NET Core Identity Cookie by using the ConfigureApplicationCookie method of IServiceCollection interface.
In DOT NET 5 or previous versions, add the below code to the ConfigureServices() method of the Startup class to set the expiry time to 20 minutes in sliding expiry manner.
services.ConfigureApplicationCookie(options =>
{
    options.Cookie.Name = ".AspNetCore.Identity.Application";
    options.ExpireTimeSpan = TimeSpan.FromMinutes(20);
    options.SlidingExpiration = true;
});
On a DOT NET 6.0 or later versions we use the following code in the Program class.
builder.Services.ConfigureApplicationCookie(options =>
{
    options.Cookie.Name = ".AspNetCore.Identity.Application";
    options.ExpireTimeSpan = TimeSpan.FromMinutes(20);
    options.SlidingExpiration = true;
});
ASP.NET Core Identity Remember Me
We will now create Remember Me feature which will ensure Identity remembers us for a very long time. We only need to login for the very first time and Identity will create a persistent cookie for us in the browser.
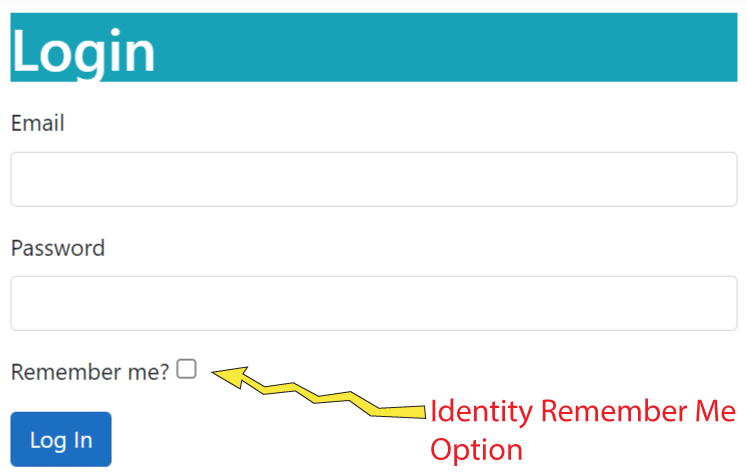
To make this feature we will have to add a remember me checkbox on the login view.
@model Login
@{
    ViewData["Title"] = "Login";
}

<h1 class="bg-info text-white">Login</h1>
<div class="text-danger" asp-validation-summary="All"></div>

<form asp-action="Login" method="post">
    <input type="hidden" asp-for="ReturnUrl" />
    <div class="form-group">
        <label asp-for="Email"></label>
        <input asp-for="Email" class="form-control" />
    </div>
    <div class="form-group">
        <label asp-for="Password"></label>
        <input asp-for="Password" class="form-control" />
    </div>
    <div class="form-group">
        Remember me? <input type="checkbox" asp-for="Remember" />
    </div>
    <button class="btn btn-primary" type="submit">Log In</button>
</form>
Next add bool type property called Remember on the Login.cs class as shown below.
public class Login
{
    [Required]
    public string Email { get; set; }

    [Required]
    public string Password { get; set; }

    public string ReturnUrl { get; set; }

    public bool Remember { get; set; }
}
This property will be automatically bind with the value of the remember me checkbox through model binding technique.
Now we can assign this property value to the “PasswordSignInAsync” method 3rd parameter as shown highlighted below.
[HttpPost]
[AllowAnonymous]
[ValidateAntiForgeryToken]
public async Task<IActionResult> Login(Login login)
{
    if (ModelState.IsValid)
    {
        AppUser appUser = await userManager.FindByEmailAsync(login.Email);
        if (appUser != null)
        {
            await signInManager.SignOutAsync();
            Microsoft.AspNetCore.Identity.SignInResult result = await signInManager.PasswordSignInAsync(appUser, login.Password, login.Remember, false);
            if (result.Succeeded)
                return Redirect(login.ReturnUrl ?? "/");
        }
        ModelState.AddModelError(nameof(login.Email), "Login Failed: Invalid Email or password");
    }
    return View(login);
}
With this feature user has the option to use the remember me checkbox and never login again.
You can download the full codes of this tutorial from the below link:
This completes Authenticating Users in Identity and now we are in a position to create own secured areas in our website, where there will be a need to do a login and logout.


 Welcome to YogiHosting - A Programming Tutorial Website. It is used by millions of people around the world to learn and explore about ASP.NET Core, Blazor, jQuery, JavaScript, Docker, Kubernetes and other topics.